Maker Project - An Intelligent Traffic Controller with Computer Vision
Introduction
This page provides a presentation of an intelligent crossroad traffic control system I developed as my maker project in the first semester of CECS8001, and my challenges as I progressed in building it. The maker project was aimed at building a system that is related to the new branch of engineering, solves a problem we are motivated about, learn new skills while at it. I decided to build computer-vision based traffic controller because of my experience with the limitations of timer-based traffic controllers in Lagos, Nigeria. Also, I was excited to experiment with and build on my machine learning and computer electronics skills. Applying the skills I learned over the semester, I developed an autonomous real-time computer-vision based traffic controller that controls traffic based on the sensed current state of the traffic.
Motivation: Traffic Congestion in Lagos
Lagos is one of the most congested cities in the world with approximately 13 million inhabitants in 2015 - most of which are cars owners and youths. Even in the presence of traffic warden and timer-based traffic lights on every road, there is rarely a time where Lagos main roads are not congested with residents in cars, buses, tricycles, bikes, etc. As a working resident, there are days I had spent approximately 2 hours on a spot (seated in a bus) in the traffic. On an average, I spend a total of 5 hours on the road to and from my workplace daily - that is, if am able to avoid a really congested traffic. Lagos is tagged the third most stressful city in the world - some will say Lagos traffic is a tourist attraction on its own.
This increasing traffic congestion has posed lots of troubles and challenges for Lagosians which includes:
- Increased accidents while trying to avoid rush-hour.
- Exposing the lives of Lagos workers to danger as they have to leave their homes as early as 3 a.m-4 a.m and return home late in the night.
- Stress, poor immune system and health problems.
- In cases of emergencies, a serious gridlock can result in loss of lives.
- Missed opportunities like job interviews, business meetings, flight schedule etc.
Key Skills and Components
- Raspberry pi
- Male to Female jumper wires
- Light Emitting Diodes (LEDs)
- Raspberry pi camera
- Coral Edge TPU USB Accelerator
- Monitor
- External Keyboard
- External Mouse
- Resistors
- Breadboard
- Ethernet Cable
- SD card
- USB Cable
- MobileNet SSD v2 (COCO) – a TFLite object detection model
- Traffic controller program (in Python)
- Code Editor: Mu Code
Activities
Project Planning and Initiation
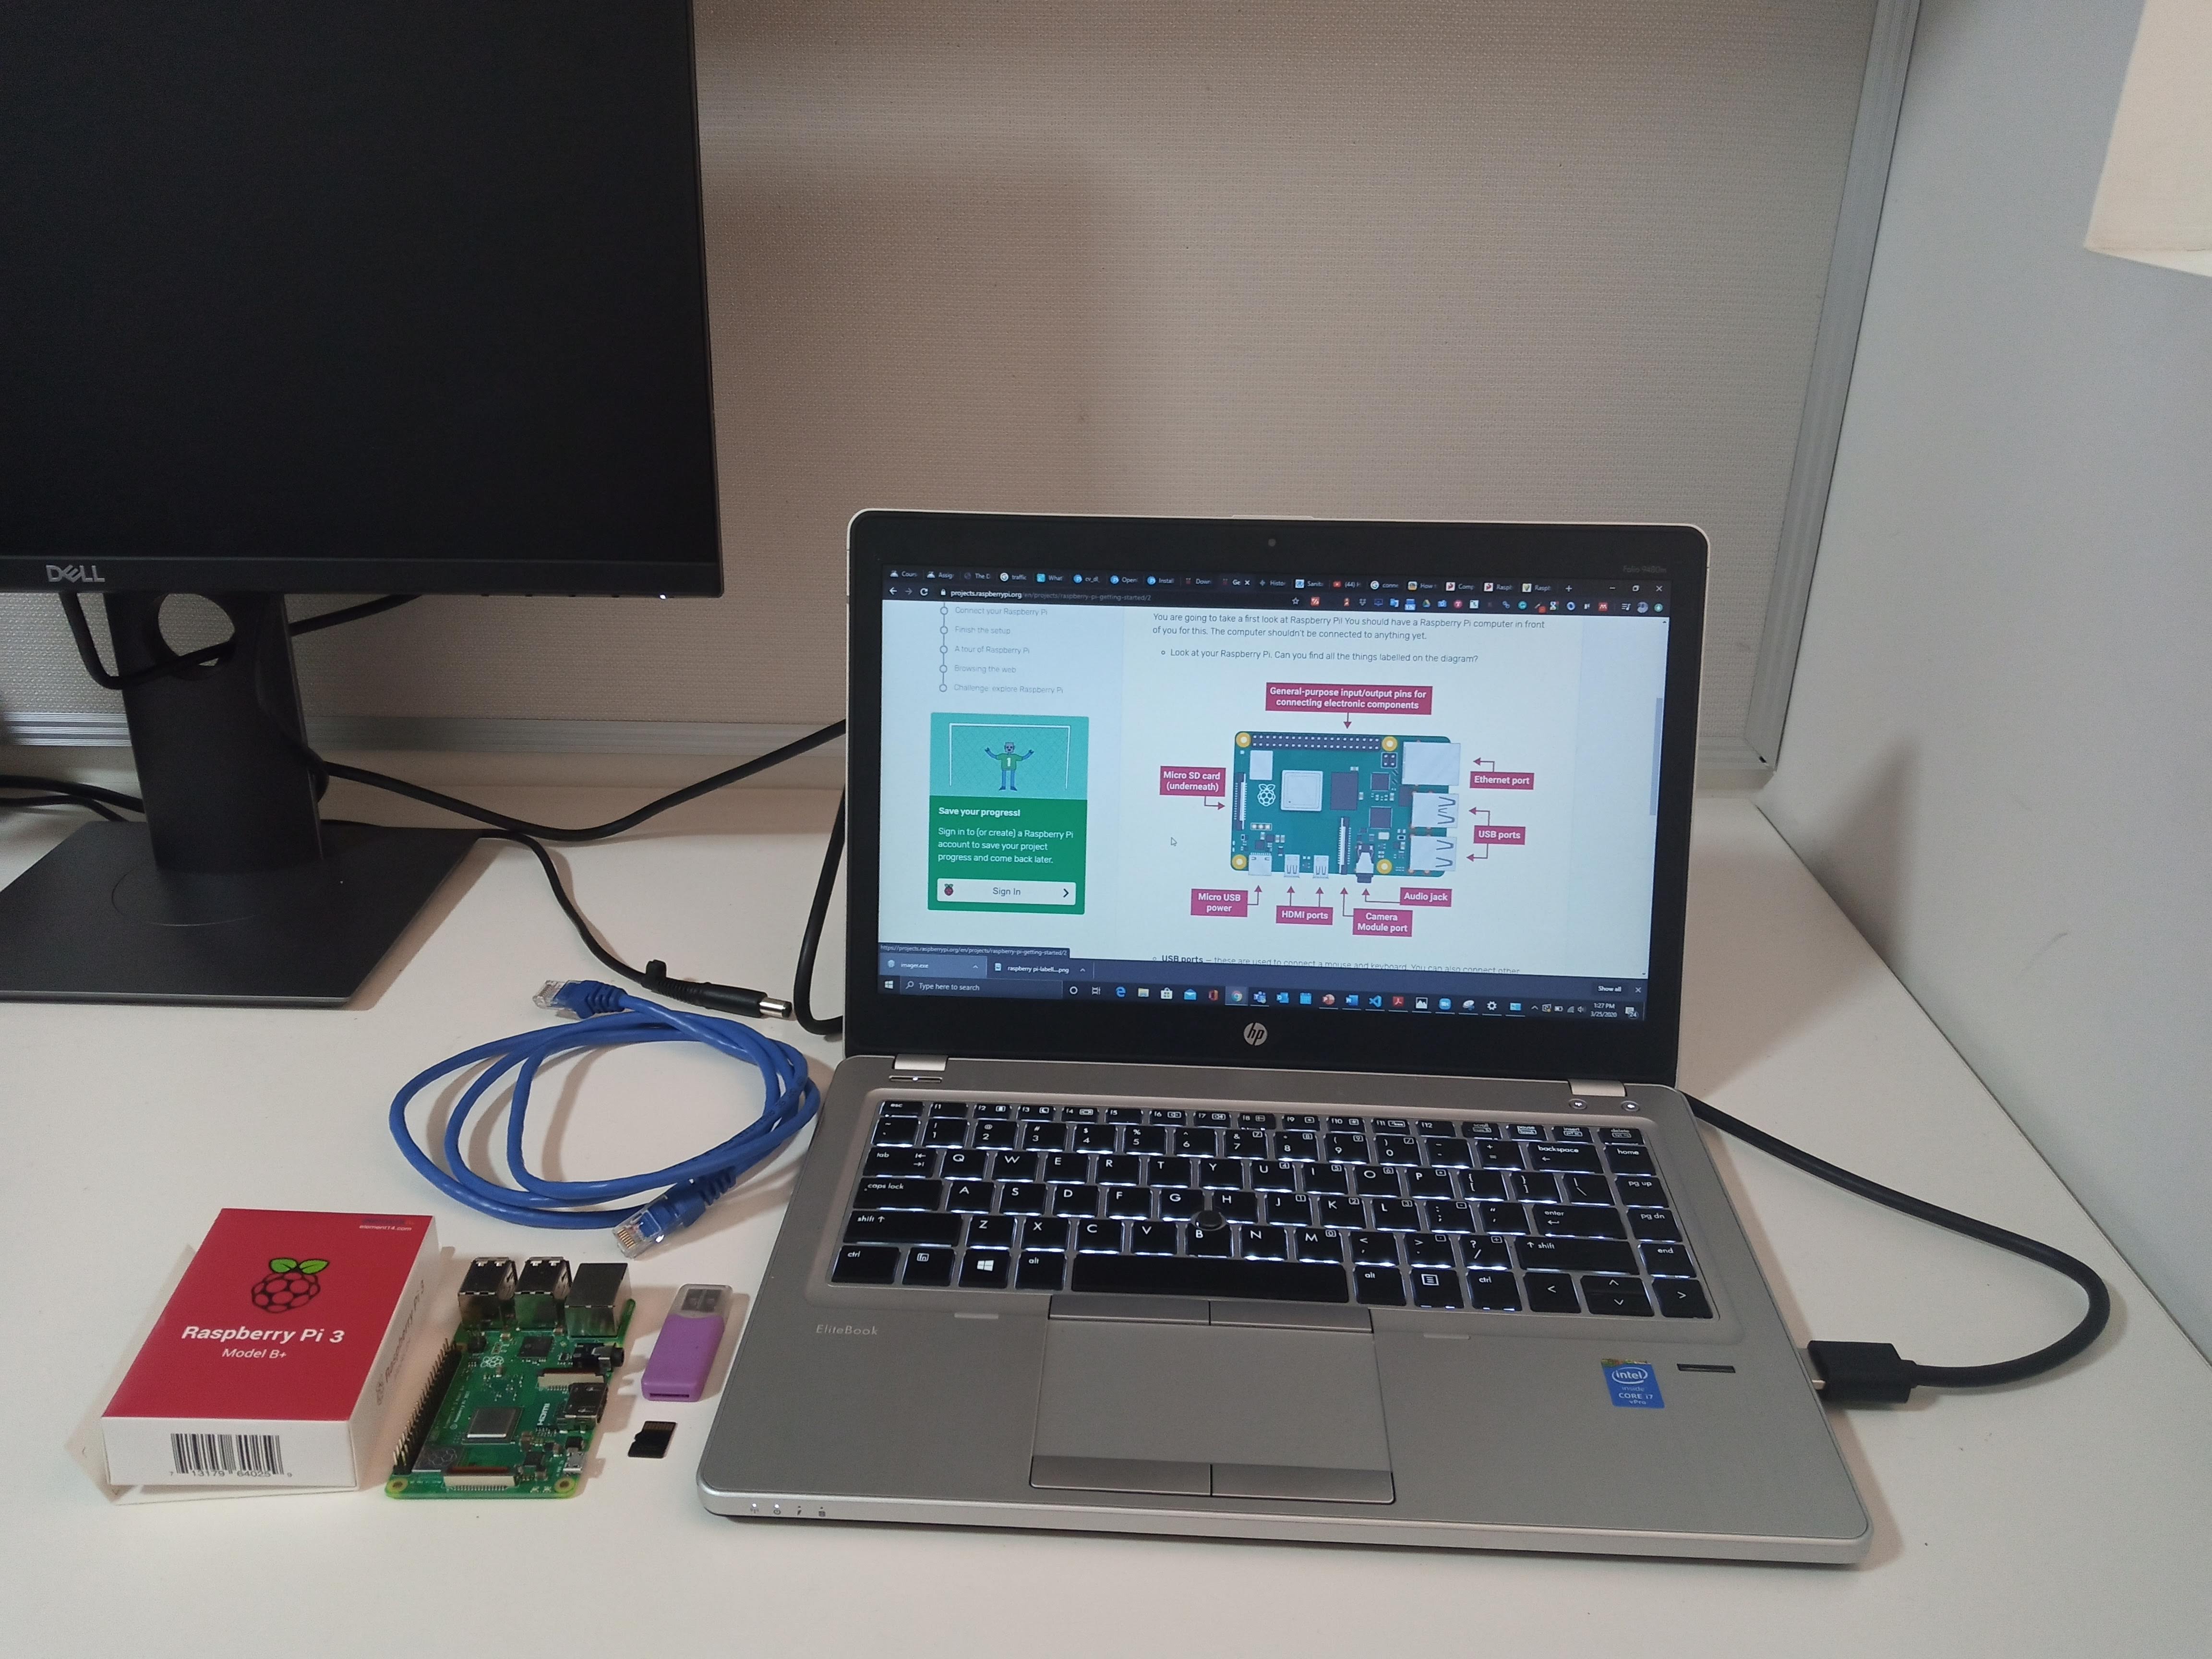
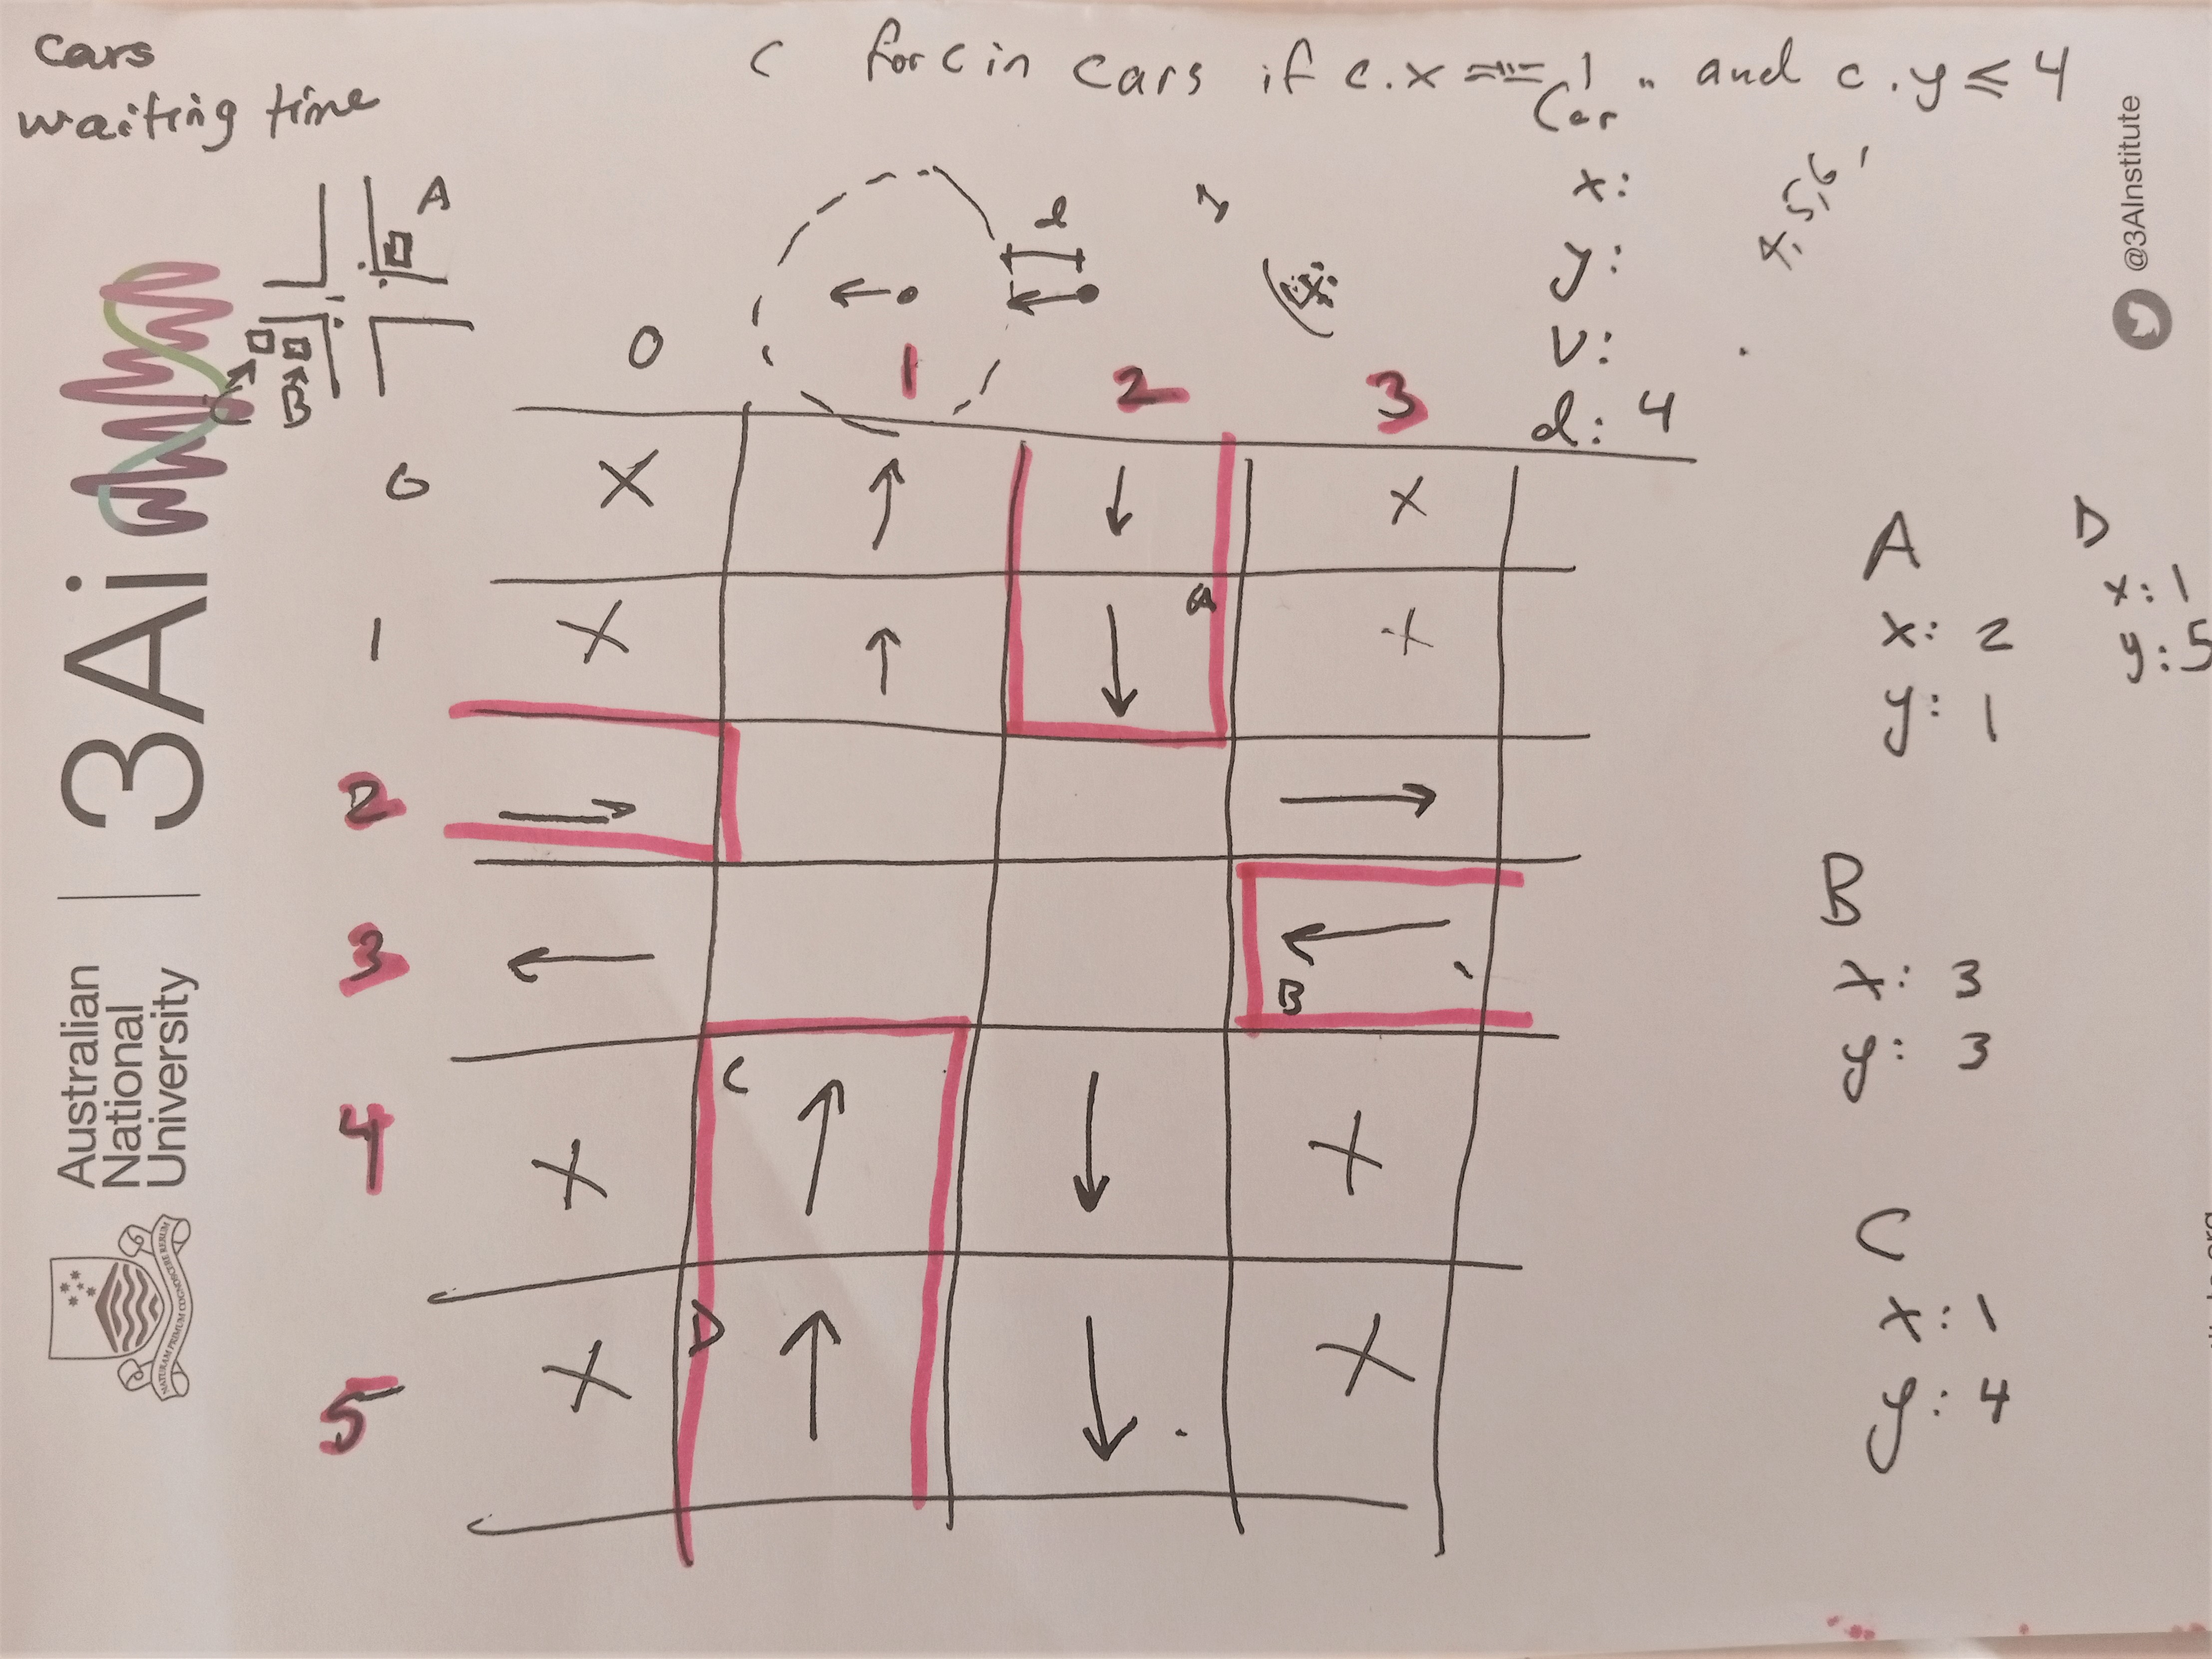
This involved reflecting on the type of solution I wanted to build and the tools I need to bring it to scale. I began with deciding what traffic I wanted to build the traffic controller for. I decided to a traffic controller for a 4-way crossroad because most of Lagos busy roads are usually of this form and it is a complex traffic - starting with it helps me understand other roads. After this, I discussed with Johan, and we came up with a sketch of the traffic and a formal definition of the problem as seen below. This was a starting point for me in designing the logic of the traffic controller.
Setting Up Raspberry Pi and Pi Camera
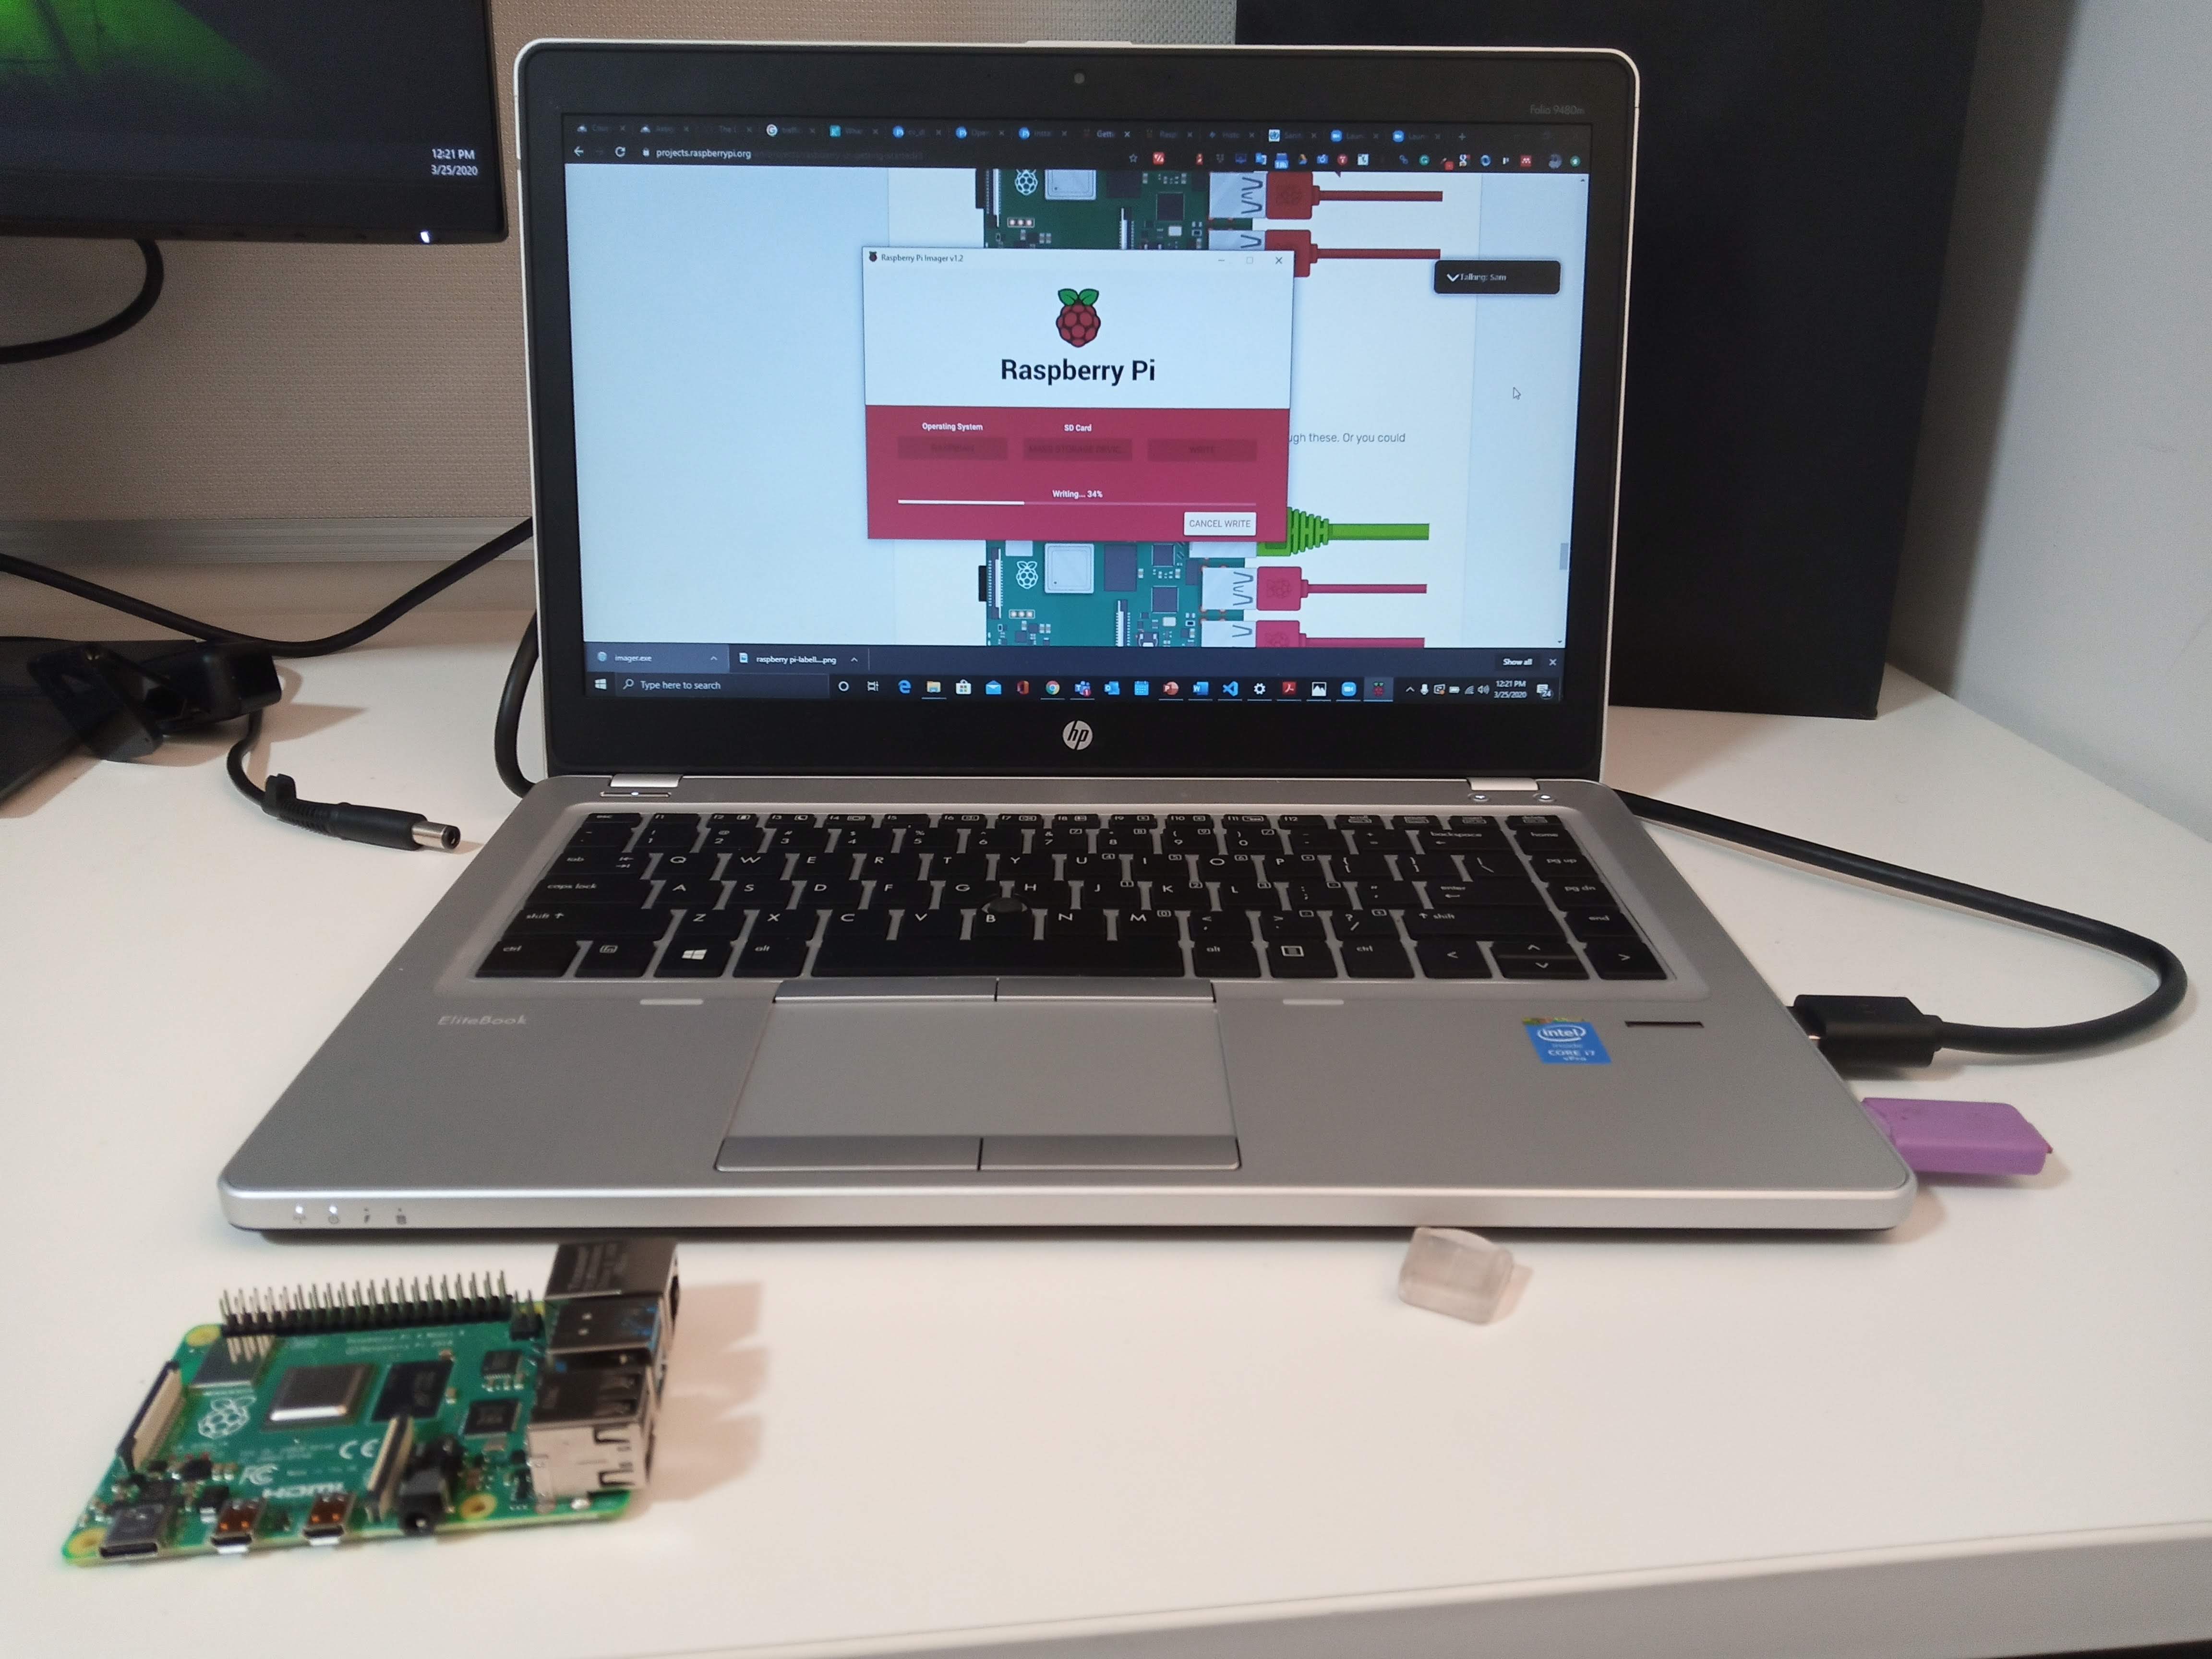
This activity was guided by the detailed instructions for setting up the Raspberry Pi on the getting started. The activity went as follows:
- Downloaded the Raspberry Pi Imager for Windows and used the imager to Install Raspbian on my SD card
- Inserted the SD card Raspberry pi to install the Raspbian Operating System (OS), connected the monitor, keyboard, mouse, pi camera, and ethernet cable to their respective ports, then connected electrical power to pi via USB cable.
- Once pi booted, I finished setting up following the prompts, and set my password. This was followed by an auto-update of Raspbian OS (the ethernet cable connected it to Wi-Fi); I had to restart it for the update to be completed.
- Connected the camera to the camera module port
- Enabled the camera interface and tested the camera by taking pictures through command prompts following these instructions
- Attempted taking multiple images and videos with Python code
- Connected a webcam and took picture with it using this guide. However, the pictures from the webcam were blurry and not as clear as those of pi camera
Assembling and Controlling the LEDs
Given my experience from the introduction to circuitry and sensors classes, and how I have learned about the importance of reading documentations and getting familiar with components pins the hard way, I began this activity with:- Reading the official Raspberry pi GPIO (general-purpose input/output) pins documentation. Although, it wasn't detailed enough for me
- Read a more general and detailed explanation of the pins and Pi modelshere
- Installed Mu Code code editor on raspberry Pi
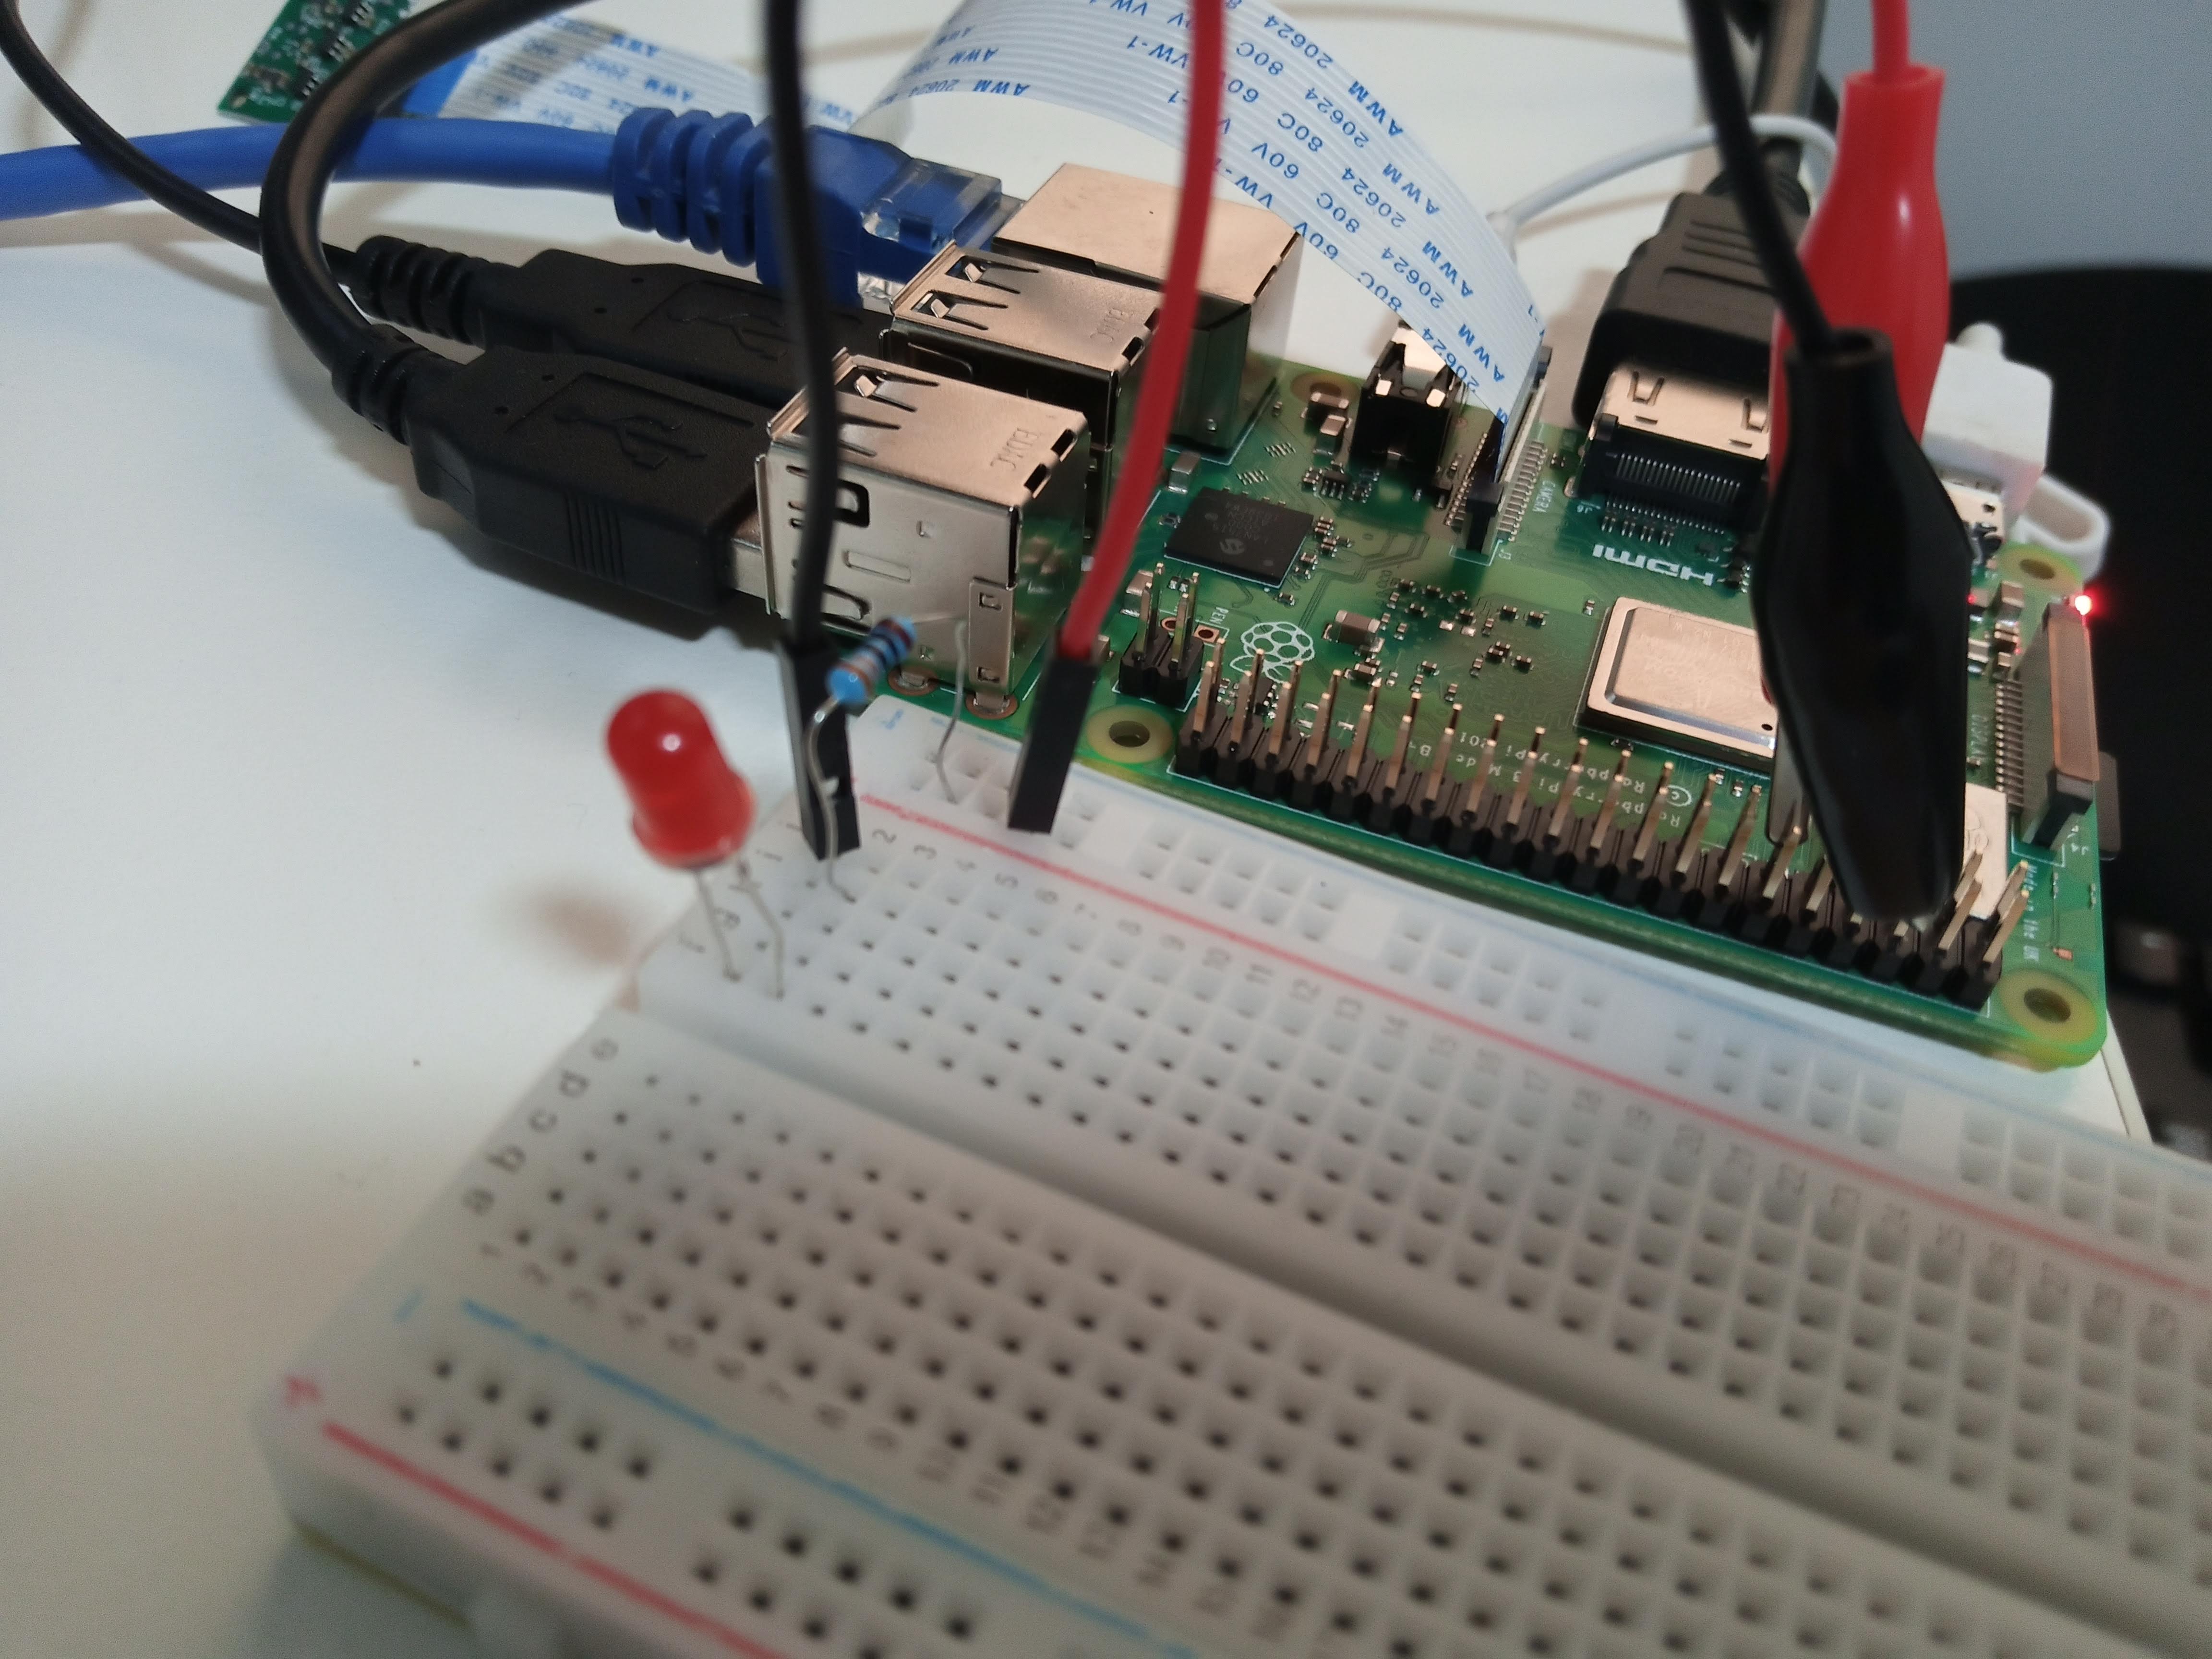
- Assembled an LED and a resistor on the breadboard, connected the LED legs to Pi's (Ground and 3.3V) pins and blinked the LED using this guide
- Read the GPIO documentation to get familiar with the GPIO LED built-in funtions
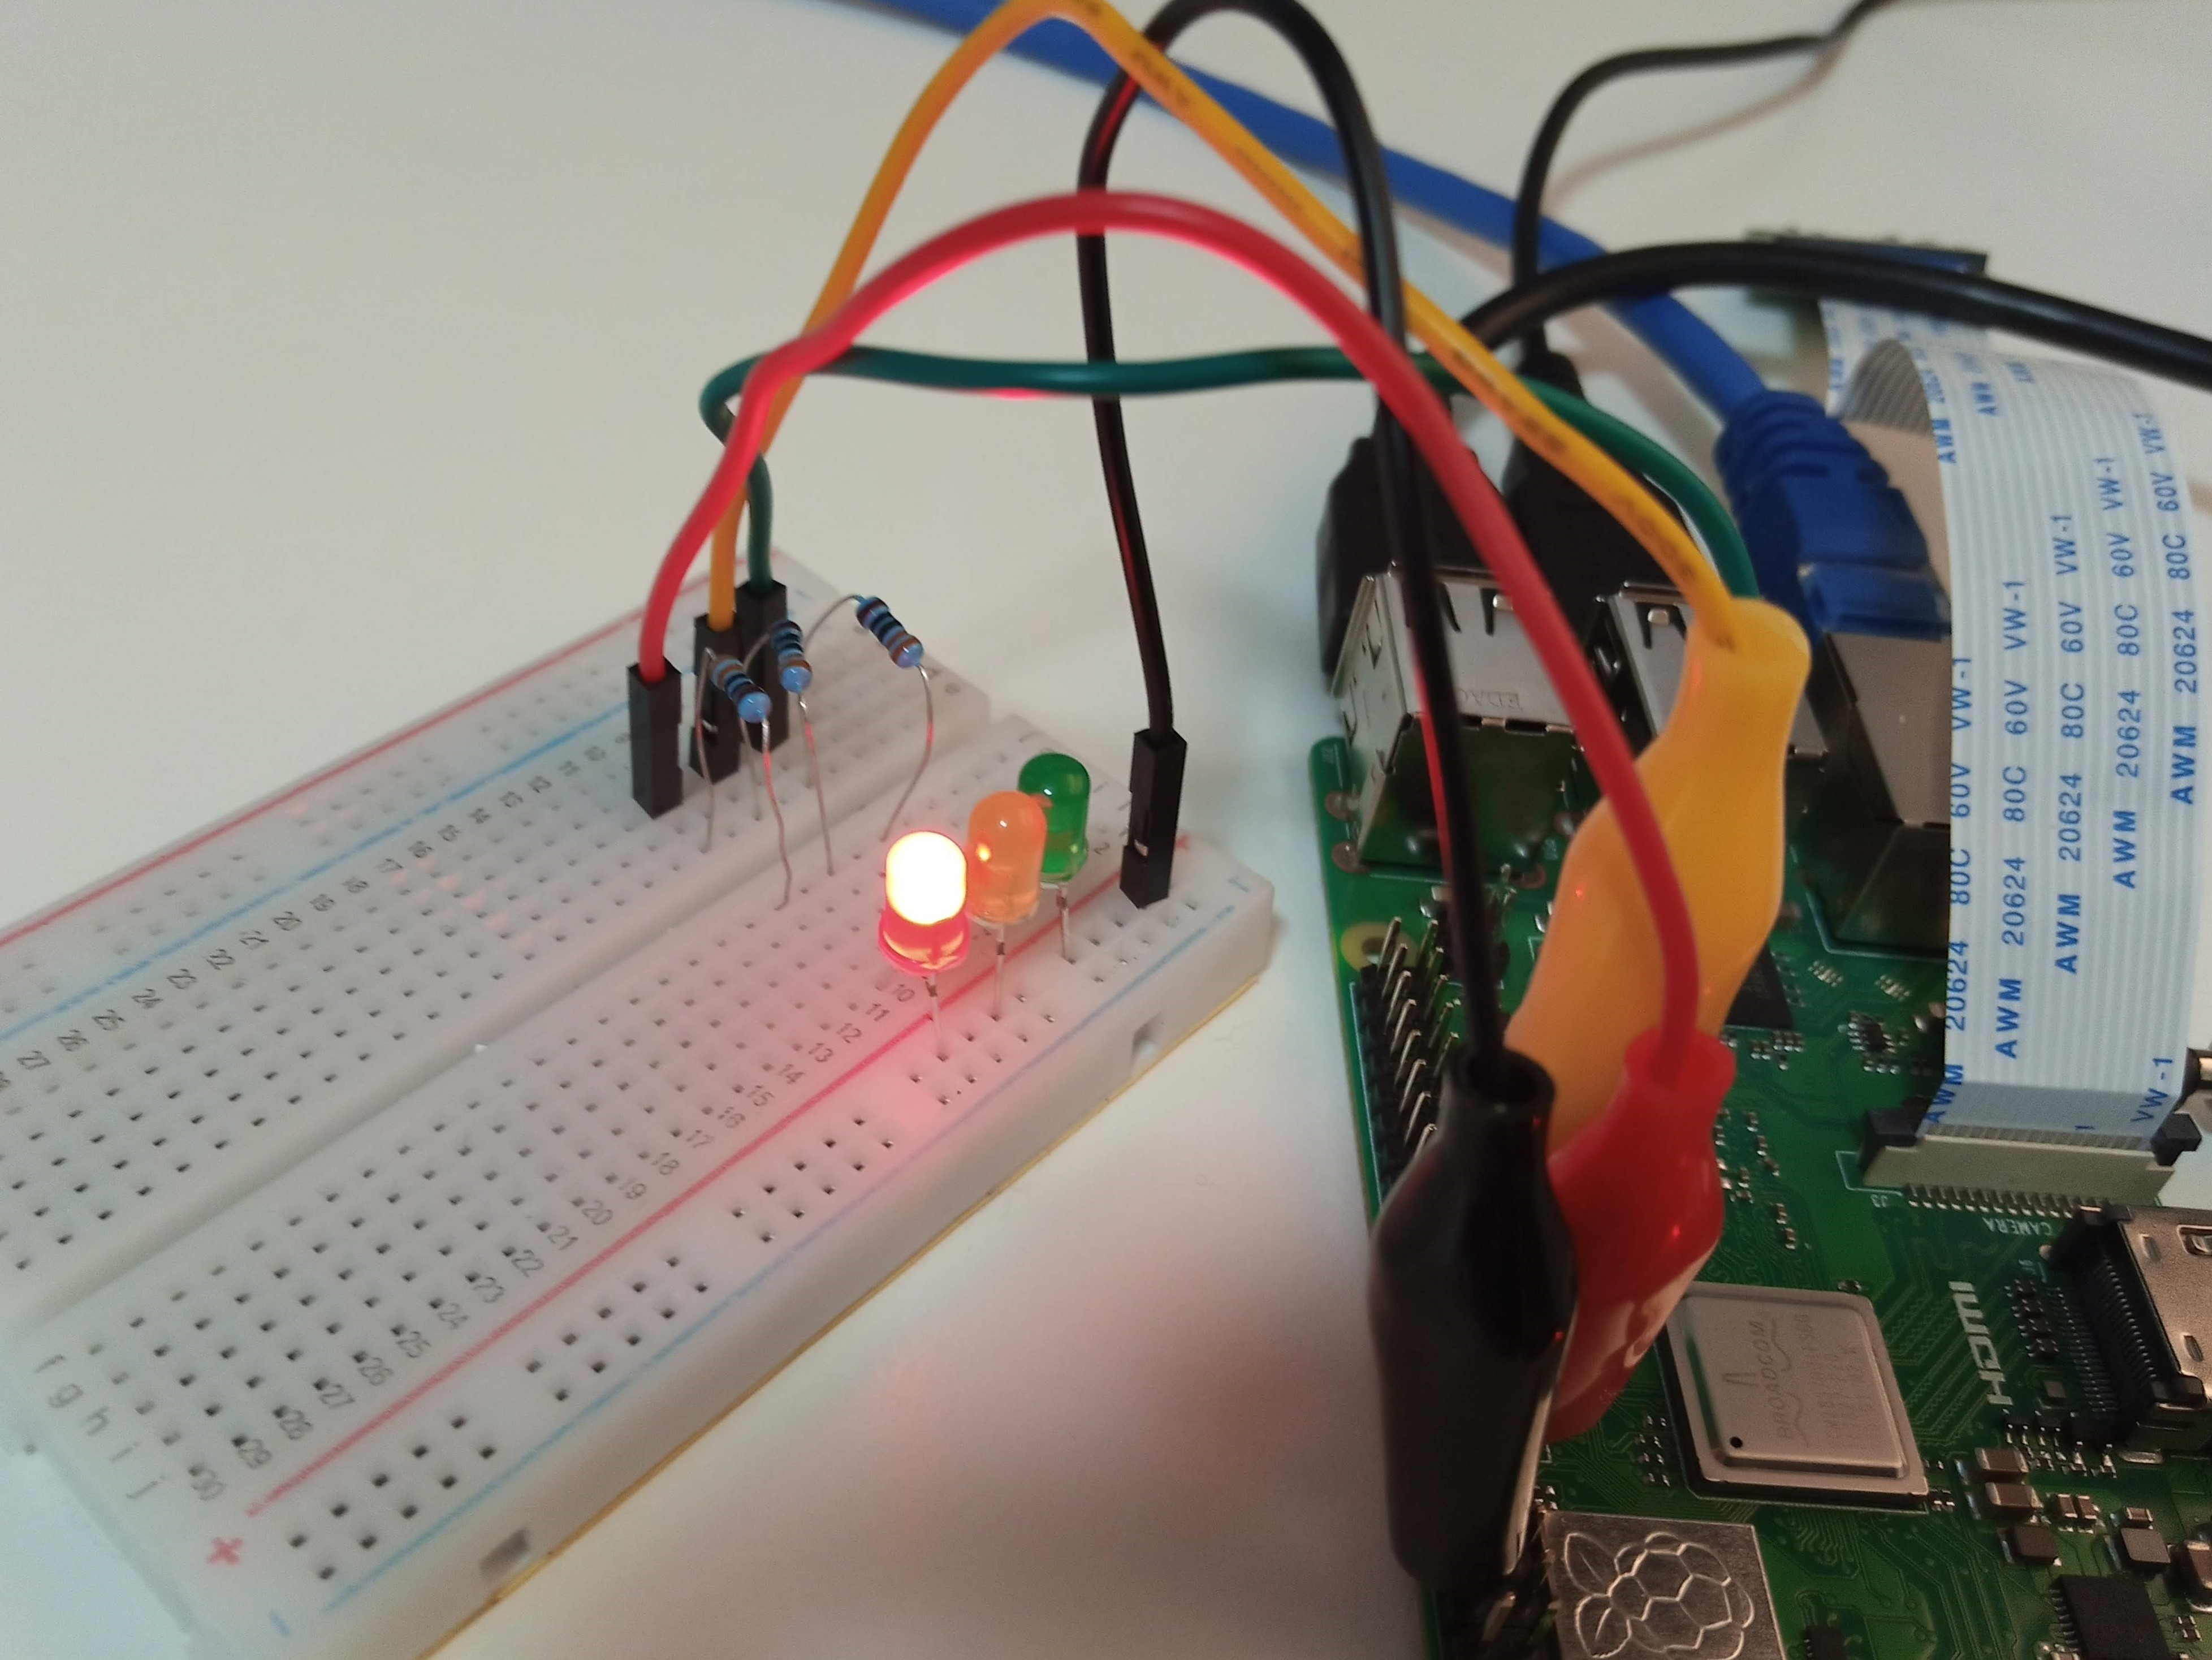
- Made a simple traffic light controller with a green, a red and a yellow LED and blinked them sequentially
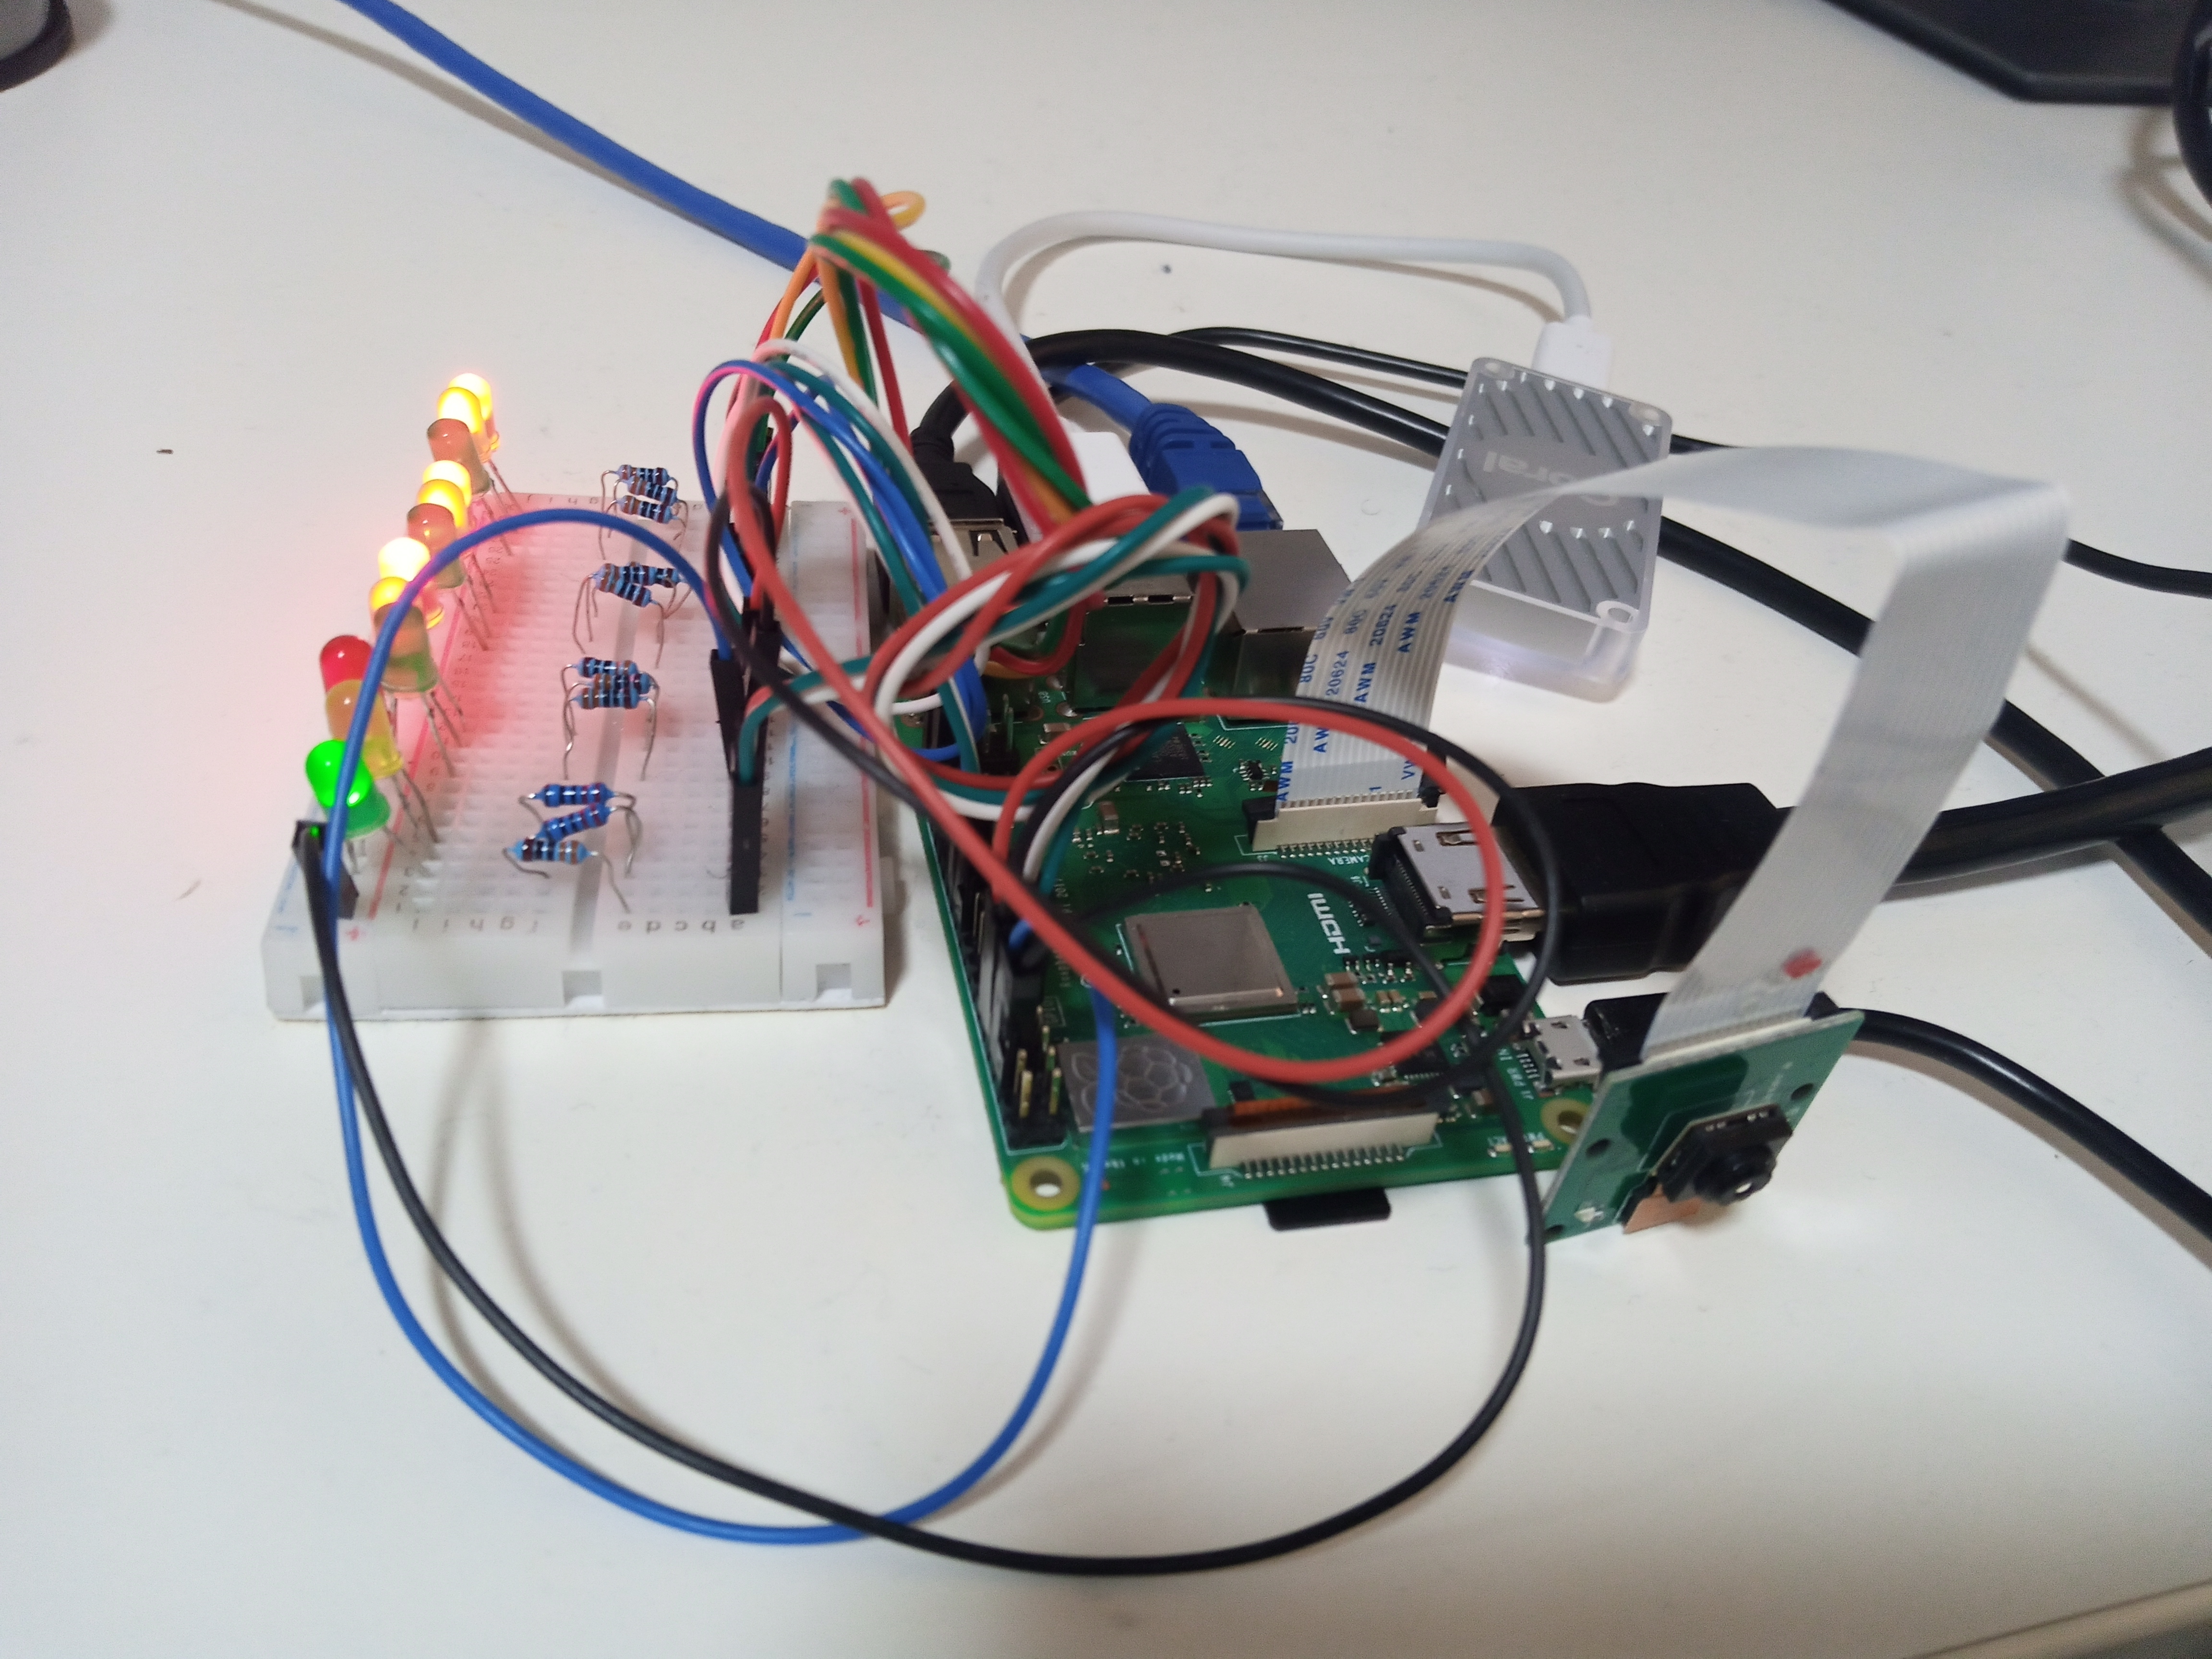
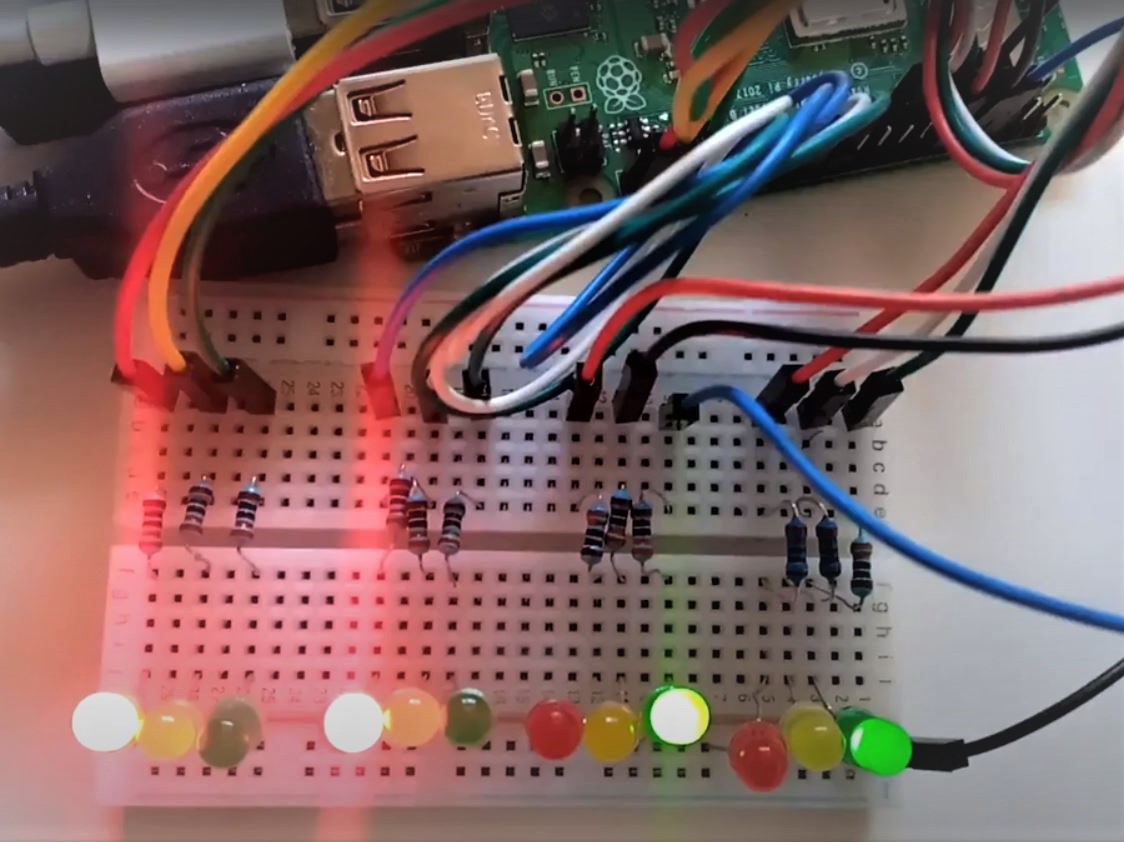
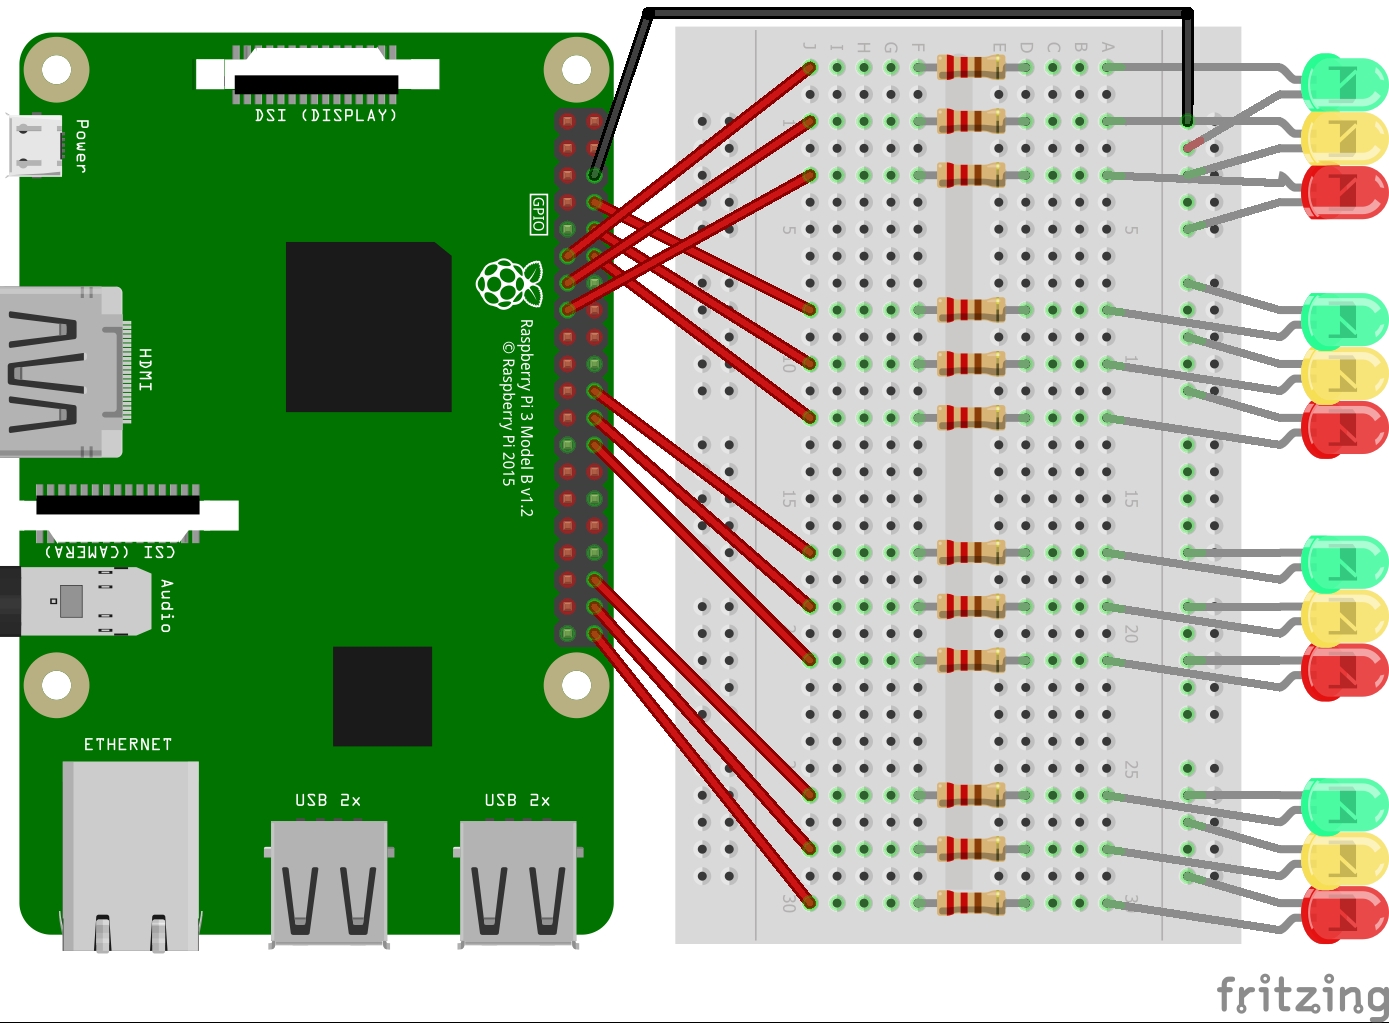
- Progressed to assemble 12 LEDs on the breadboard and connect them to pi GPIO pins
- Wrote the code for the timer-based traffic controller
Challenges and (Re)solutions
- Although, I had read and comprehended the GPIO pins configuration, and I knew the LEDs power requirement is 3.3V-5V. However, connecting the LEDs to the 5V pin zapped them. It took burning out 3 LEDs to realize this, and made me decide to sick to 3.3V.
- When I connected the 3 LEDs to pi, the LEDs wouldn't light up, this I discovered was due to the fact that I mixed up my connections to power and ground while connecting the LEDs (connected the wire for ground to power and vice versa). Undoing that made the circuit work as expected.
- Also, I noticed one of the LED's light was faint, after playing around with positions of the LEDs, I discovered this happened to LEDs connected to a particular resistor, changing the resistor brightened up the LEDs. This was a 1k resistor while others were 220R
- Progressed to assemble 12 LEDs (4 red, 4 green, 4 yellow) for the 4-way crossroad light control
Traffic Controller Algorithm
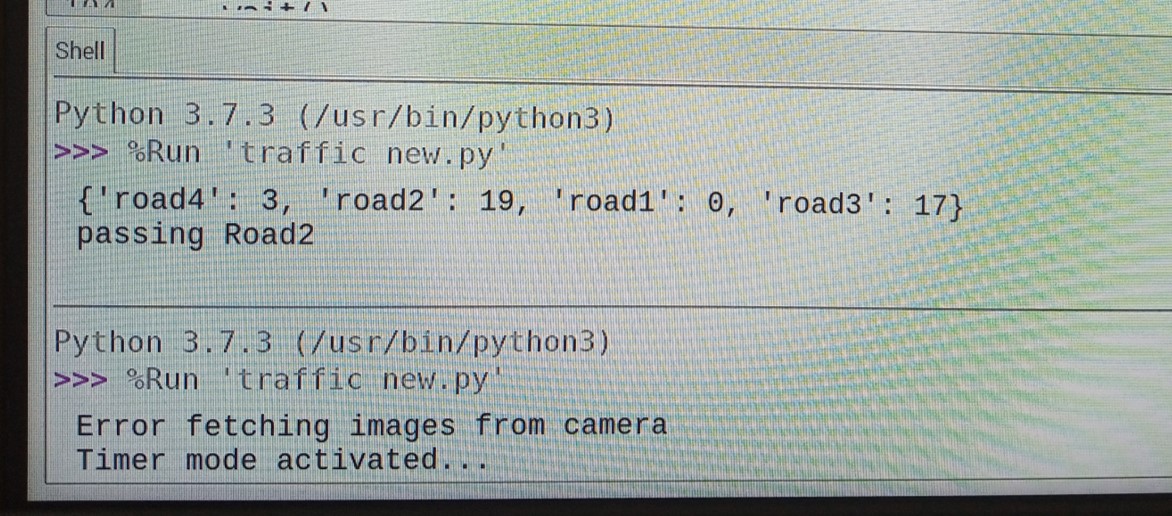
After building the timer-based traffic controller, I needed to make the system intelligent and sensitive to changes in traffic scenarios - this is where computer vision comes in. The way the system is intended to work is it iteratively:- Capture real-time images of the road
- Detect the number of cars on each traffic
- Determine the road with the maximum cars
- Stops other traffics and pass the traffic with the max number of cars
- If the roads have equal number of road, then pass the next road on the sequence
- If there is an error capturing image or using the machine learning model, then activate timer-based controller
Computer Vision with Raspberry Pi
To enable the system to be able to "see" what's happening in real-time, I needed it to deploy computer vision algorithms. Even though I had no computer-vision experience prior to this, I was able to achieve this; but not without its frustrating challenges.Challenges and (Re)solutions
- Training a model from scratch - to build a machine learning model from scratch, I needed to:
- Gather images of cars and traffic, prepare them (crop, label and annotate them), split them into train and test sets. Training really good models will require thousands of images, preparing thousands of images sounded like a lot for me to do in a short period.
- Build the model and export it for deployment. To build the model, I needed to choose between Keras, Pytorch, Tensorflow, Fast.ai, etc., all of which I was not familiar with. Where do I start learning these and how do I decide which I best for me?
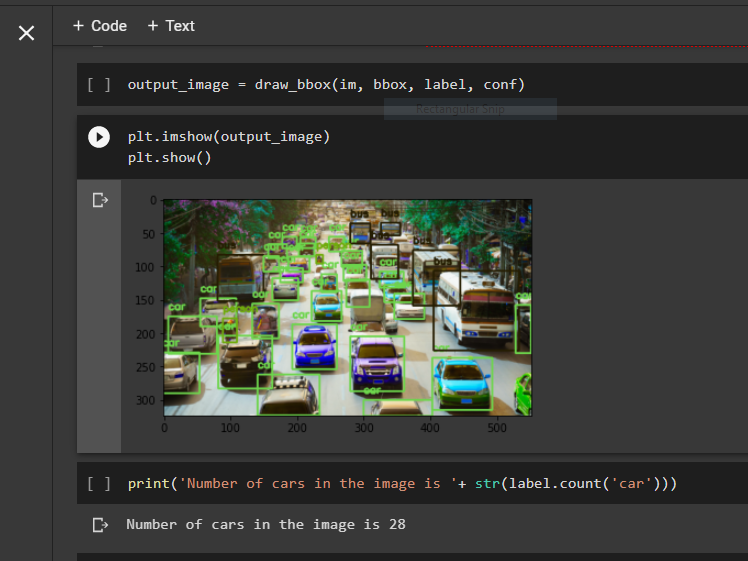
- Working with Yolo3 Model - after reading tons of articles, watching overwhelming tutorial videos and exploring Github repositories, I was able to set up my Raspberry pi for image processing by following this guide, then I tested it and learned the principles of object detection here. Afterwards, I came across this article where I can detect and count the cars in an image in 10 lines of Python code! This and other Yolo guides I found worked perfectly in Google Colab as seen in the below images.
- Takes hours to run the model
- Freezes Raspberry Pi - which I found out is due the processing power and memory consumed in training the model. I had to restart Pi some times
- Returns no output - not even an error message after freezing pi for hours.
- Transferring the captured images to Google Colab for machine learning processing, and sending the number of cars to Raspberry pi. However, I couldn't figure out how to make Google Colab detect that new images have been uploaded. Also, this will require the system to work online in contrast to my plan of having an offline solution
- Reducing the images sizes and make the image black and white - Tried it, didn't work. The issues were with the model itself, not the images.
- Setting up a machine learning server - this will require constant connection to the internet.
- Restarting the project afresh - I uninstalled Raspbian and wiped the SD card and started afresh.
- Using lite versions of the models - I never knew Tensorflow model had lite versions! Since I was starting afresh, I decided to try out TensorFlow Lite

Working with Tensorflow Lite Models
In this phase, I created a virtual environment in Pi (to avoid having to restart) and installed TF Lite there - at this point, Johan had also given me Google Coral Edge TPU USB Accelerator to help accelerate my machine learning processes. I was able to set up TF Lite and the USB Accelerator following this guide, and I was able to classify images with it in seconds. However, I wanted to detect objects in images and not classify the images and following this guide from Coral's Github page only resulted in errors.
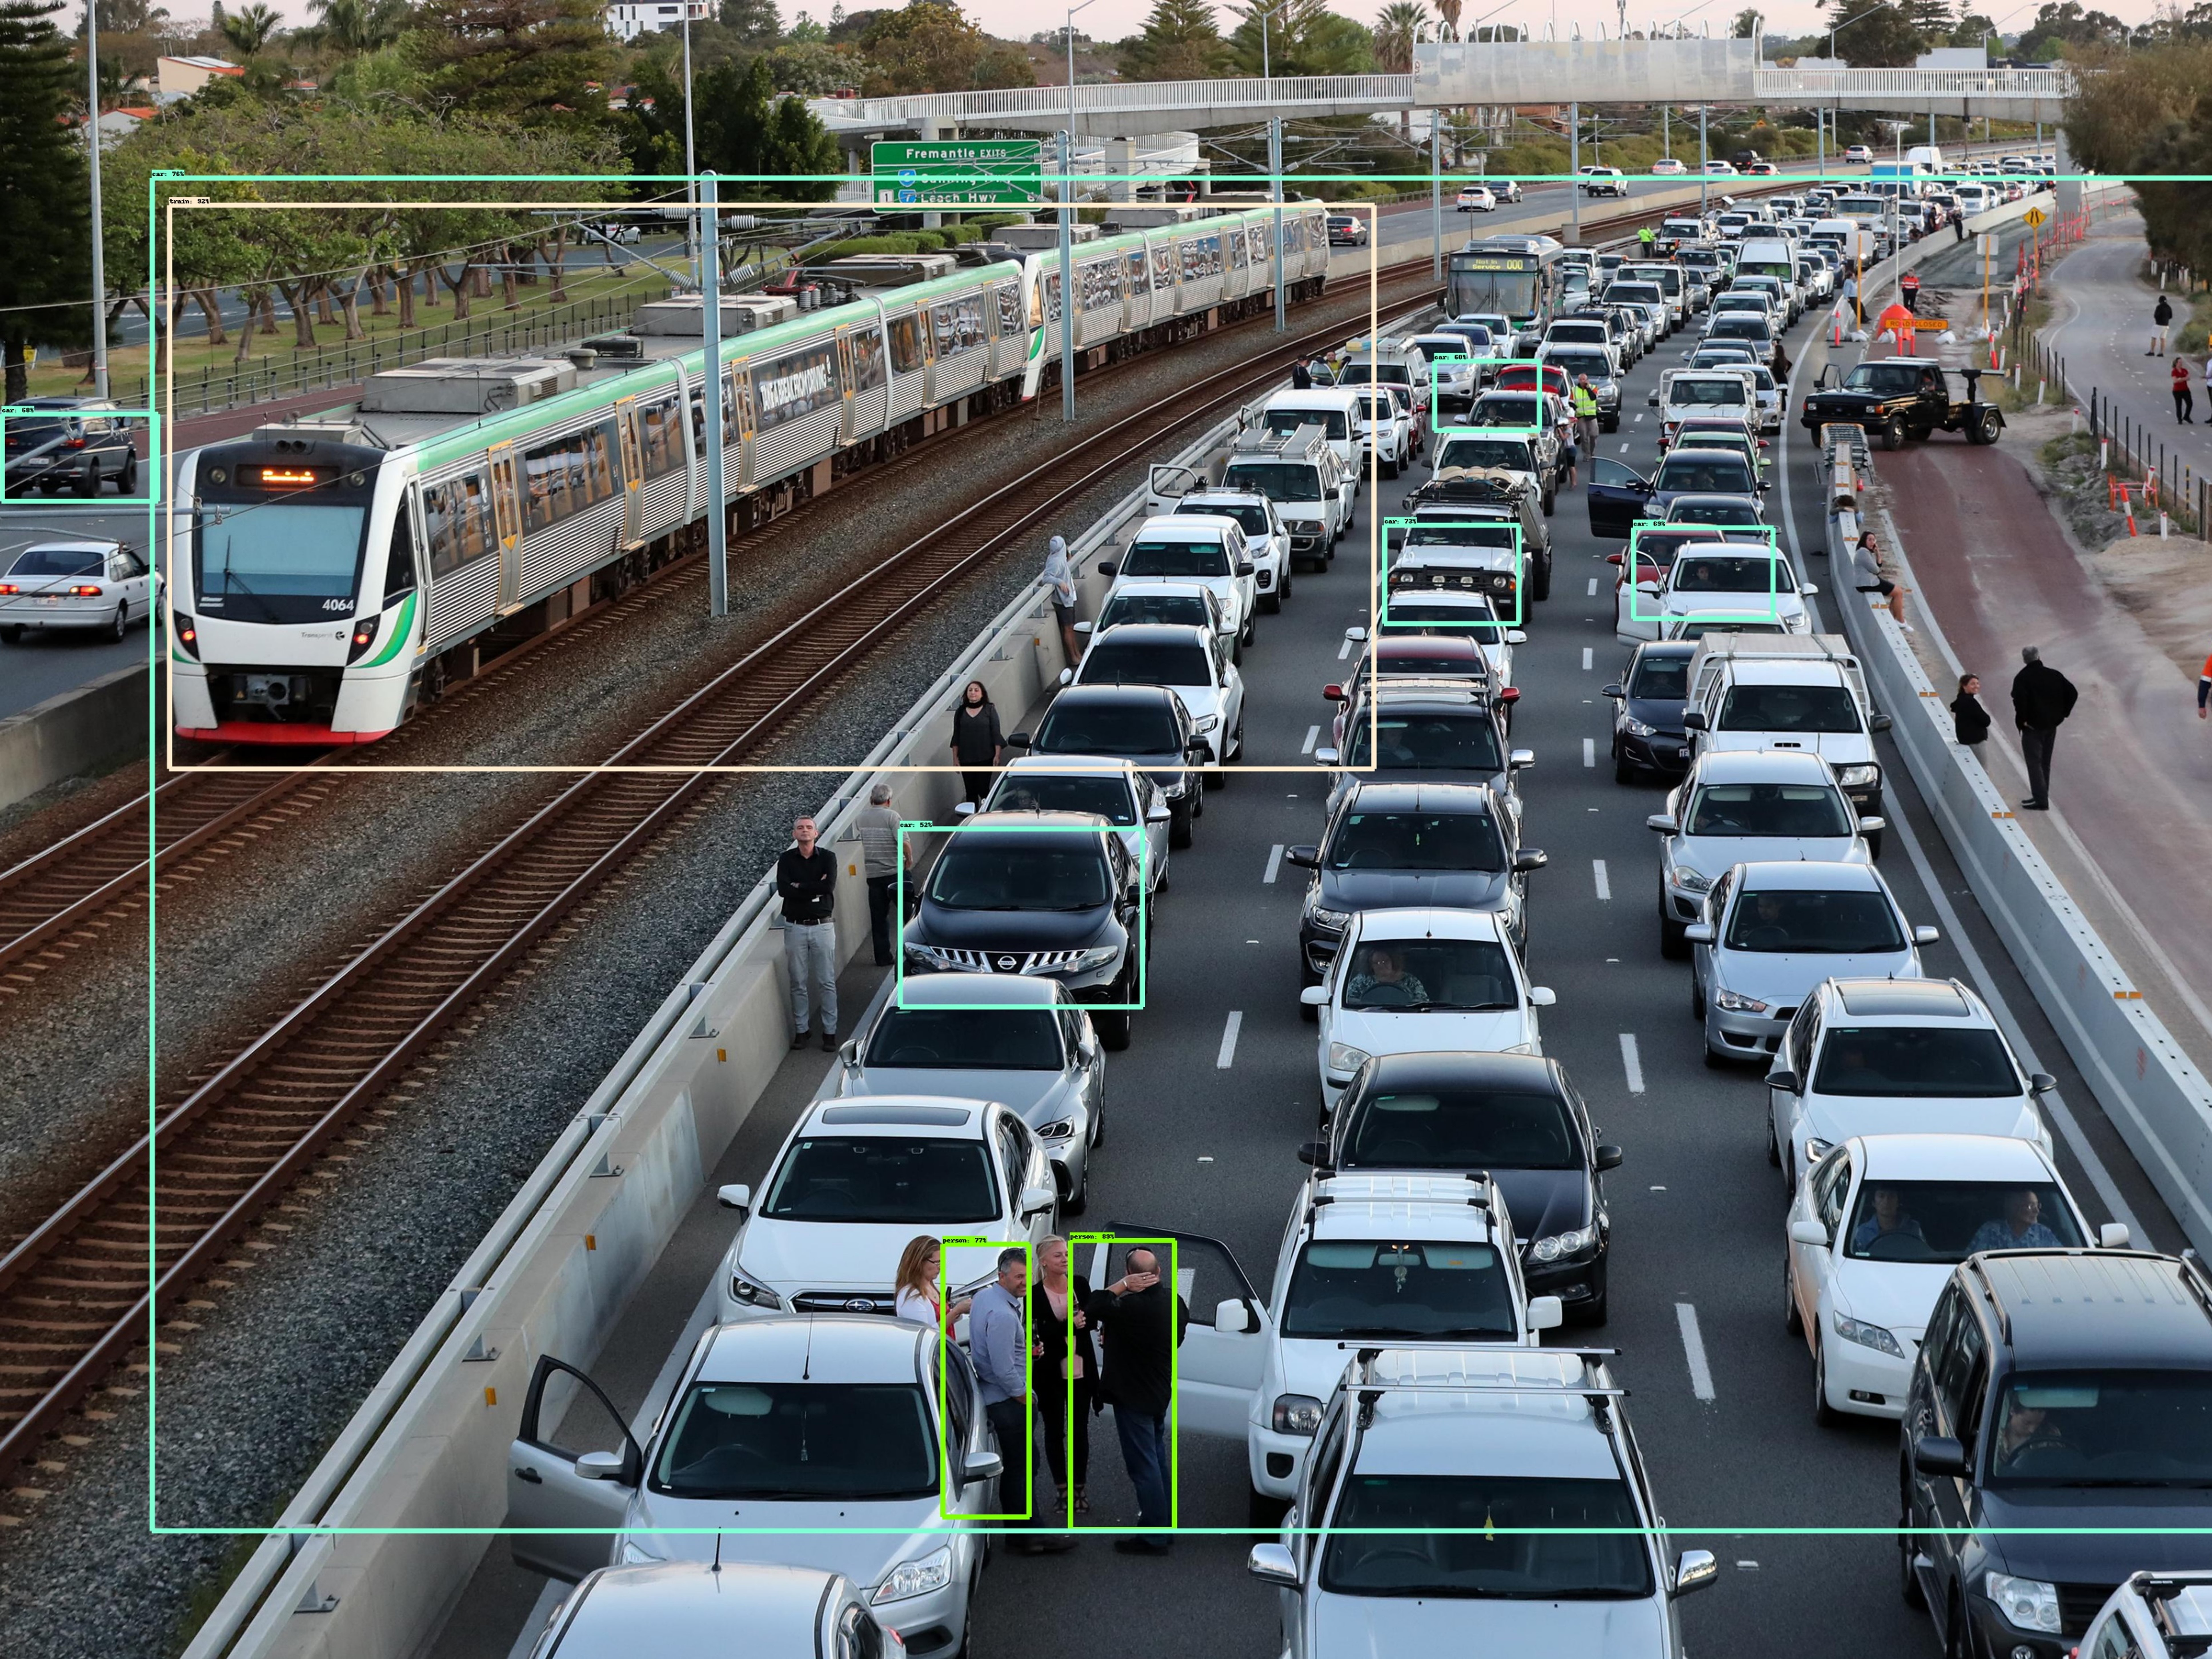
Hours/Days of surfing the internet led me to this detailed guide from Edge Electronics on how to run TensorFlow Lite object detection models on the Raspberry Pi using their sample code. I decided to work with the MobileNet SSD model from coral models list as it was optimized to perform object detection on microprocessors like Raspberry pi, and it can detect up to 90 objects. Running the model on a traffic image resulted in the below image.
Challenges and (Re)solutions
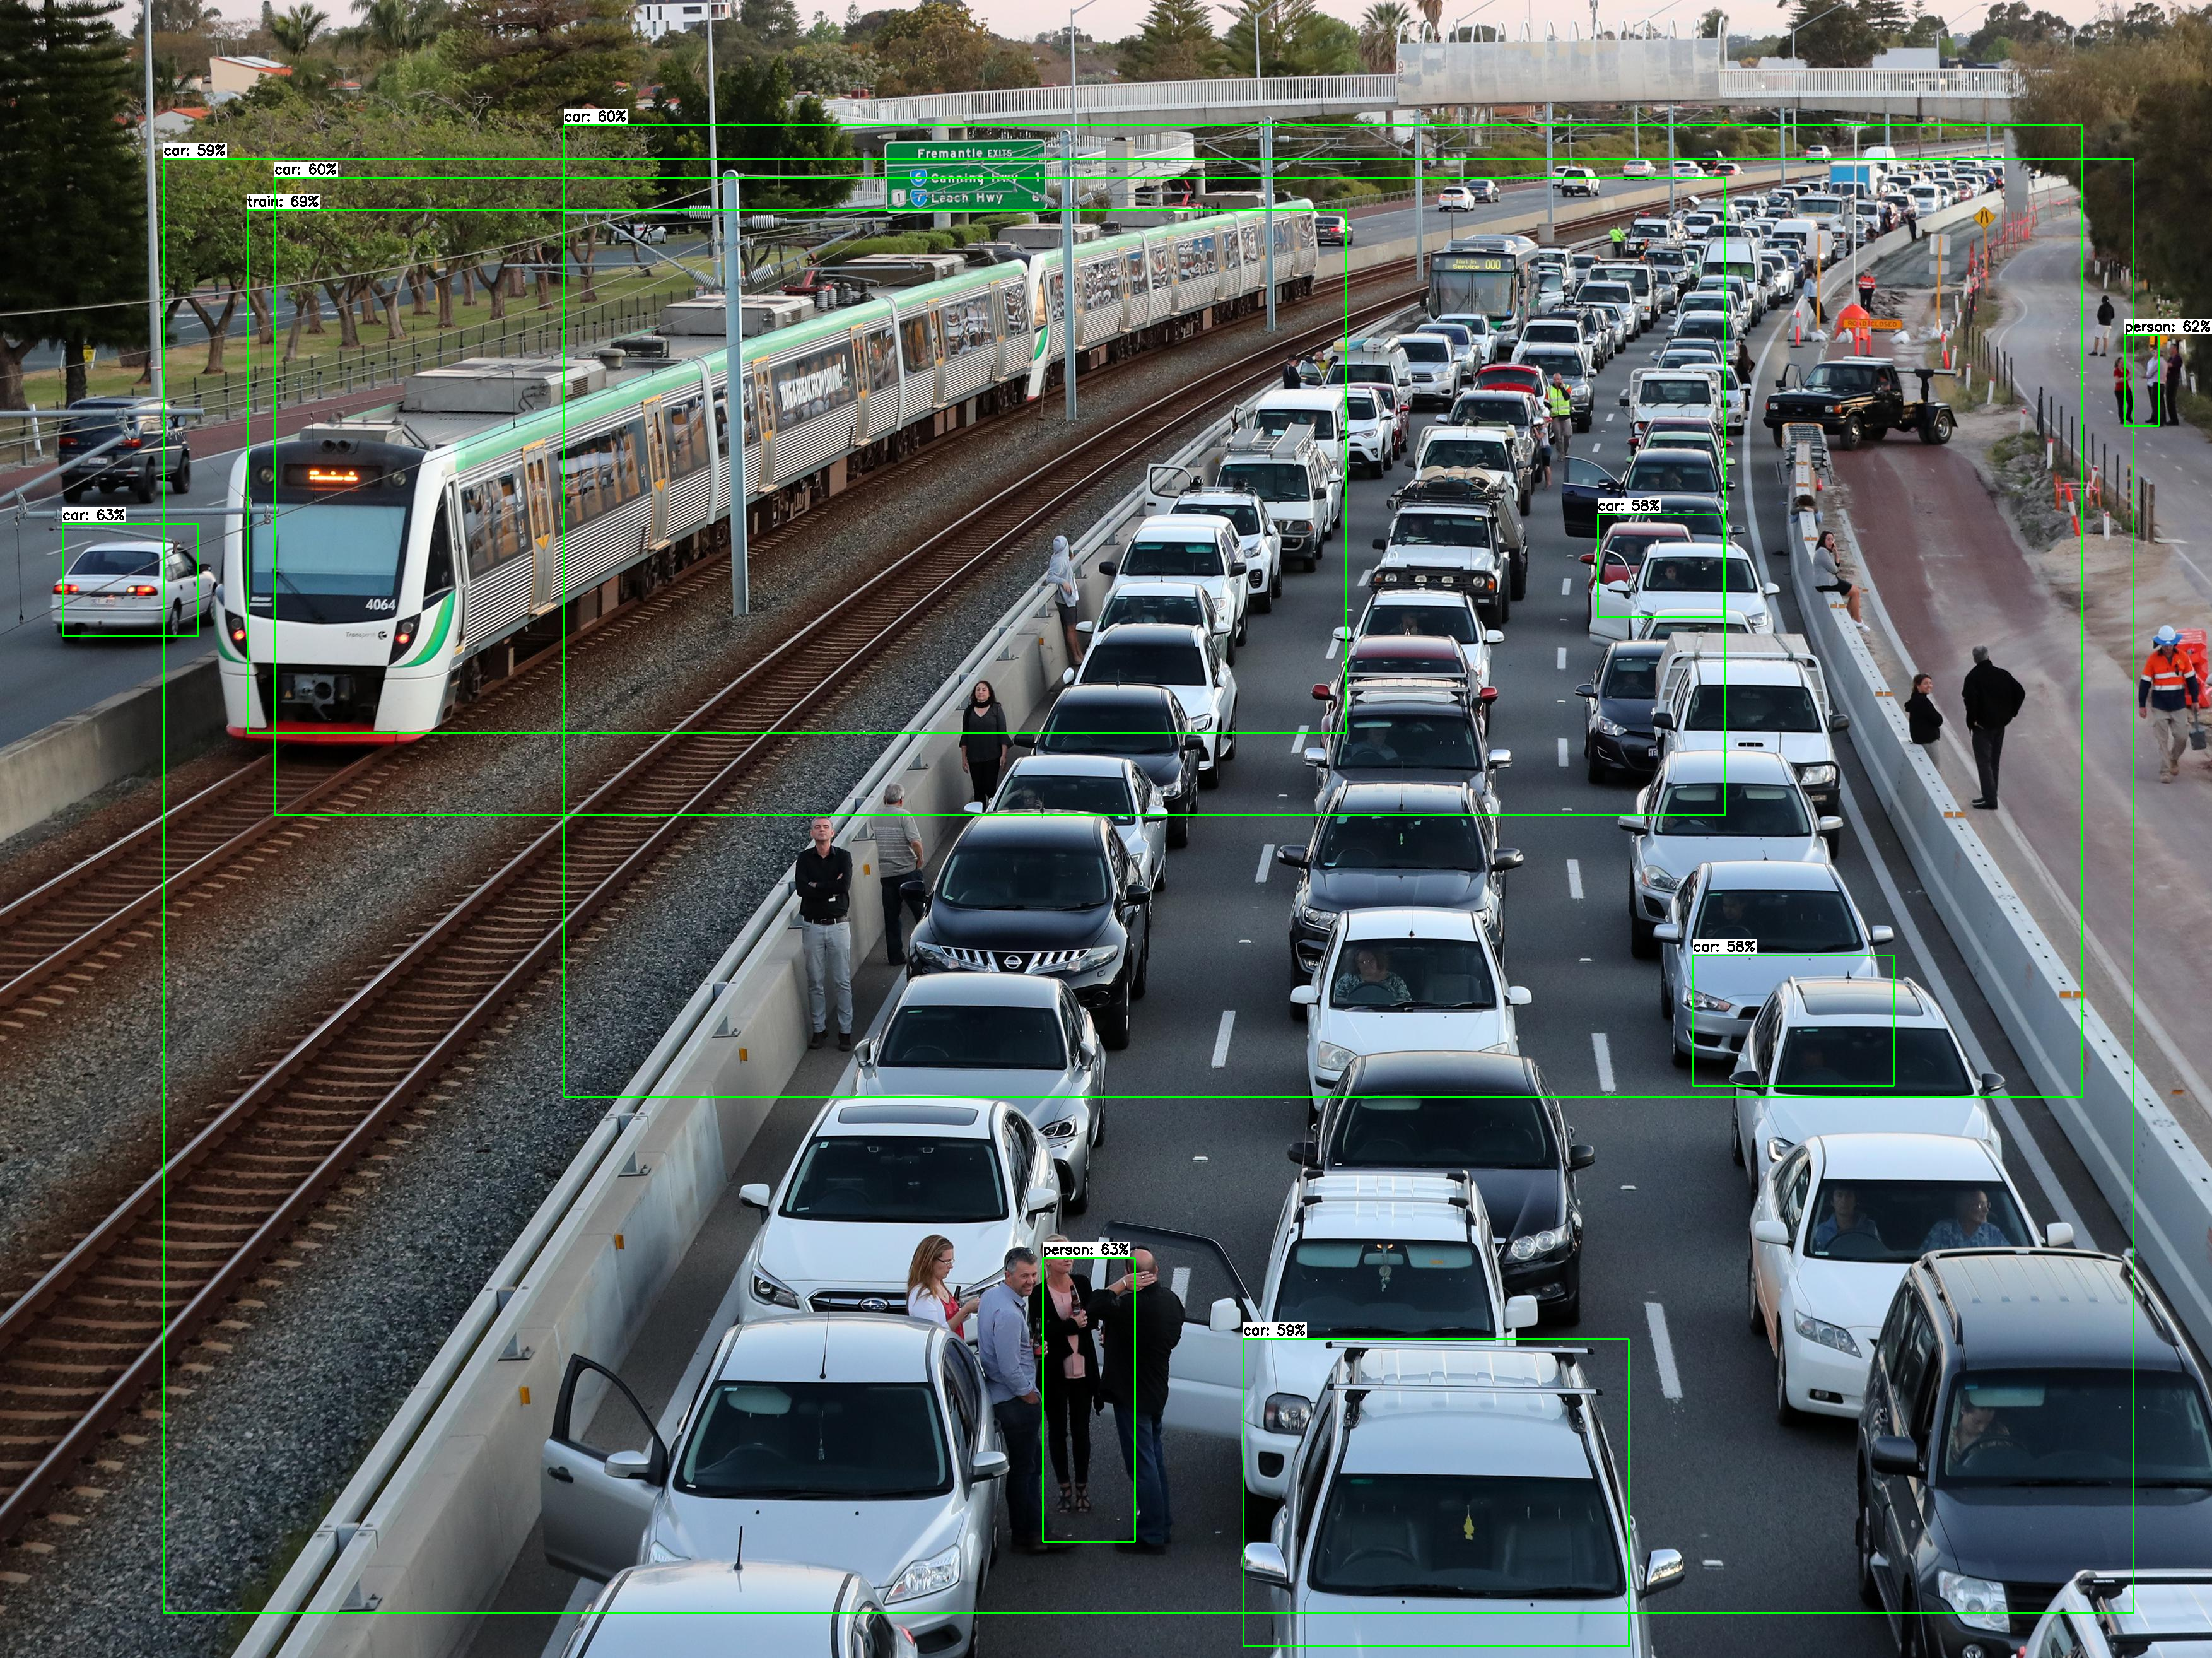
- Even though TF Lite works on Raspberry pi, it has less accuracy than YOLO and can only detect 10 objects in an image.
- Given how inaccurate the TF lite models are, I attempted training my Lite model from scratch. Following this guide shows that I would require Nvidia GPU, installing Anaconda, CUDA Tool kit and CuDNN on my system. There was no way I could get Nvidia in such short time. So, I tried retraining Coral's model using this guide. However, this guide seem to have been prepared for experts and I had difficulty understanding the content.
- In order to bypass this "10 objects" constraint in the MobileNet SSD model, I needed to modify the model to detect more than 10 objects. I reached out to Kathy Reid who really took her time to guide me and directed me towards the file I needed to modify to be able to modify the model
Takeaway Lessons
- 3.3V power is not the same as 5V power!
- Let the amount of current you want to pass through your circuit determine the resistor you use
- Sometimes, when building scalable and complex systems, some trade-offs have to be made. Like choosing between training the model offline vs online (would have been easier), choosing between YOLO (high accuracy and processing power) and TensorFlow Lite (low accuracy and processing power)
- When faced with deciding which of really overwhelming list of resources to use, go with the one that is more understandable - have been designed for people at your level of expertise.
- Avoid the temptation of avoid the seemingly difficult approach or giving up on it while trying or trying out every solution to solving a problem. Pick one, see it through to the end before trying another approach.
- Project management: even though I had a timeline for the project at the beginning, being stuck on making getting a working machine learning model for the system took most of time and became my only focus; I was not working with the timeline anymore. A talk with Zac about my challenges made me realize that I had ignored other important parts of the system I needed to work on. This helped to redirect my focus and got me back on track.
Achievement
At the end of the activities, I:- Built an intelligent traffic control system that processes images with computer vision technologies offline.
- Learned how to create circuit design models and created one for the system's circuit
- Understood the basic principles of machine learning, image processing and object detection and know the difference between image classification and object detection
- Learned how to set up Raspberry pi, TensorFlow runtime, Coral USB accelerator create python virtual environment.
- Deployed object detection models in Raspberry pi and also modified their outputs
- Know how to program and control LEDs with Raspberry pi
- Am more familiar with deep learning frameworks like Tensorflow and computer vision models.
- Learned how to download datasets from Kaggle to Google Drive and make it accessible in Google Colab for processing while trying to train my models from scratch
- Learned about traffic control systems in deployment, how they are controlled and maintained.
Limitations and Future works
- The current system does not has no memory of its previous passes - if one traffic continues having the most cars, it continues passing the traffic until it becomes less than some other traffic. I will like to update it to limit its number of consecutive passes for a traffic
- In this system, the images is not processed instantaneously. It does this while the traffic is waiting for the next pass
- The current model's accuracy is really low. I intend to learn more about deep learning and how to train models so I can build a suitable model for the system.
Overall, working on the maker project gave me an experience that involved exploiting all the skills I have learned so far which includes - coding in Python, circuitry and sensors, data collection and analysis, networking, machine learning; and framing questions about future cyber-physical systems, their scalability, reliability and ethics. Documenting my challenges and achievements, helped me in reflecting on my progress and in communicating it to others. I also want to say a big thank you to the 3Ai staff and students for helping me with my challenges, checking up on me and my progress, and helping me achieve my goal.
Learning Resources
Below is a list of the links I learned from as I worked toward creating the traffic light:- Traffic image source: https://thewest.com.au/news/traffic/perth-hit-by-traffic-chaos-as-fatal-crashes-close-kwinana-freeway-and-leach-highway-ng-b881341576z
- Getting started with Raspberry pi: https://projects.raspberrypi.org/en/projects/raspberry-pi-getting-started/
- Getting started with pi-camera: https://projects.raspberrypi.org/en/projects/getting-started-with-picamera/
- Setting up webcame in raspberry pi: https://www.raspberrypi.org/documentation/usage/webcams/
- Raspberry pi GPIO pin explained: https://www.raspberrypi.org/documentation/usage/gpio/
- A simpler expla of the GPIO pins: https://siminnovations.com/wiki/index.php?title=General_Raspberry_Pi_I/O_pin_explanation
- Installing Python Packages in Raspberry pi: https://www.raspberrypi.org/documentation/linux/software/python.md
- Assembling the LEDs: https://projects.raspberrypi.org/en/projects/physical-computing/
- GPIO zero module documentation: Gpiozero.readthedocs.io/en/stable/recipes.html
- Preparing raspberry pi for image processing: https://www.bitsnblobs.com/getting-started-with-opencv-image-processing/ https://www.youtube.com/watch?v=H7k1YApU0pg
- Using raspberry pi for motion detection: https://www.bitsnblobs.com/basic-object-motion-detection-using-a-rpi/ https://www.youtube.com/watch?v=VF8M9DdZ_Aw
- Counting cars in images with YOLO in 10 lines of code: https://towardsdatascience.com/count-number-of-cars-in-less-than-10-lines-of-code-using-python-40208b173554
- Image classification with TensorFlow lite: https://github.com/tensorflow/examples/tree/master/lite/examples/image_classification/raspberry_pi
- Object detection with TF Lite on Raspberry pi: https://github.com/EdjeElectronics/TensorFlow-Lite-Object-Detection-on-Android-and-Raspberry-Pi/blob/master/Raspberry_Pi_Guide.md
- Saving Kaggle dataset in Google Drive and using them in colab: https://medium.com/analytics-vidhya/how-to-fetch-kaggle-datasets-into-google-colab-ea682569851a
- Kaggle dataset used: https://www.kaggle.com/jessicali9530/stanford-cars-dataset